I just update the original post, so have a look. More images to follow soon. Still waiting for the Ebay spot welder…
Frank
I just update the original post, so have a look. More images to follow soon. Still waiting for the Ebay spot welder…
Frank
Which spot welder did you order?
I want to try the 788 Sunko (148 Euro). We have a 709 Sunko (249€) in Nottingham, which works fine. We do not want to build packs for sale, so I will not invest in a fancy one. The reason why I chose this one is simple: I want to show how I do the job with this machine and post my settings and tweaks and experience. This thread is meant to go down very deep into details of DIY. I know people have issues because sometimes some info is missing. The Sunko 788 is very common and so I chose this. Benjamin has one and we did some packs with it. Works somehow and good bang for the bucks.
You need a slow fuse for the electric circuit though. I have a 230V 16A Fuse with rating C installed now. Benjamin was so kind to exchange it for me. The Sunko 788 and 709 kick out your fuse really easy. So you want a slow fuse.
Google: ABB C16A
Frank
Since most people in the diy-scene only build 1-2 packs a spot welder is bad investment. I’m actually considering buying one and renting it to people on the forums for a small fee+shipping and a deposit.
Brotherhood of the travelling spot welder kinda
Or just re-sell it after the job is done. You could organize a circling spot welder thread. Each time you use it deduct 10 Euros of its value and soon we will have lots of spot welders for everyone, costing you only 10 bucks. 149 € is no bad invest and the truth is: once you are e-skate addict, you will build more boards…
Frank
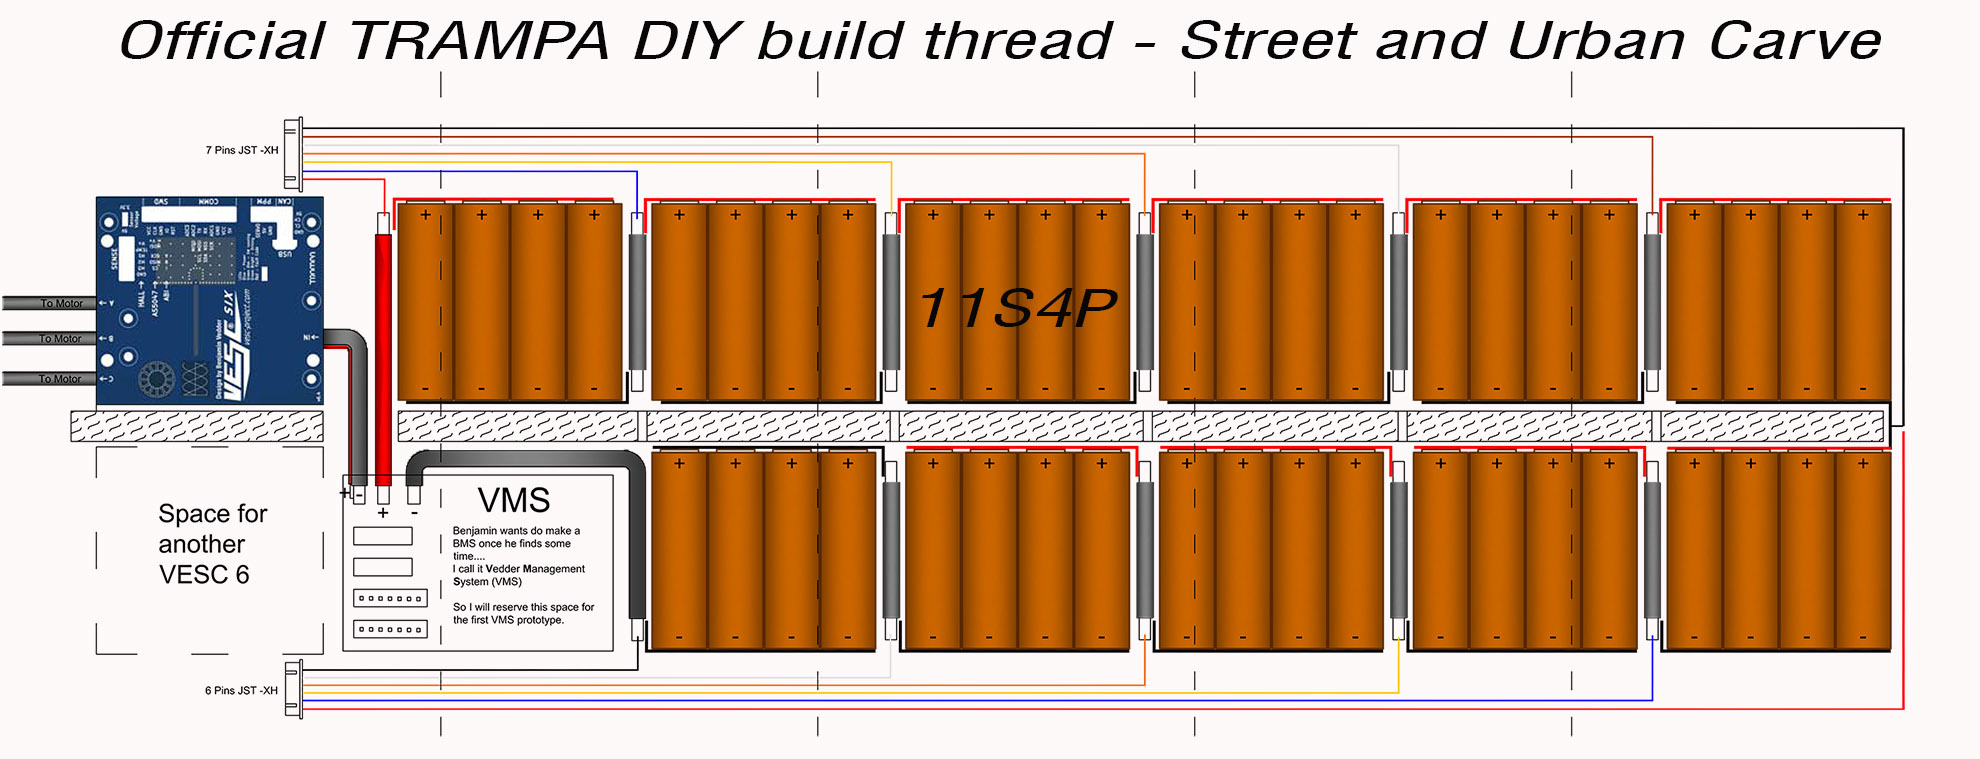
Day Two: Cells arrived, lets make the pack.
This is my Layout - its always wise to make a drawing of what you want to make before you start!
We will make 4P packs and group them to be a 11S setup. Since I want my Pack to flex without adding stiffness to the deck, I designed something special. We also want to ad a centre spine, so that impacts would not harm the cells. You don’t want a 488Wh pack to go up in flames below your feet, despite the deck being bullet proof. This is how it looks in real life:
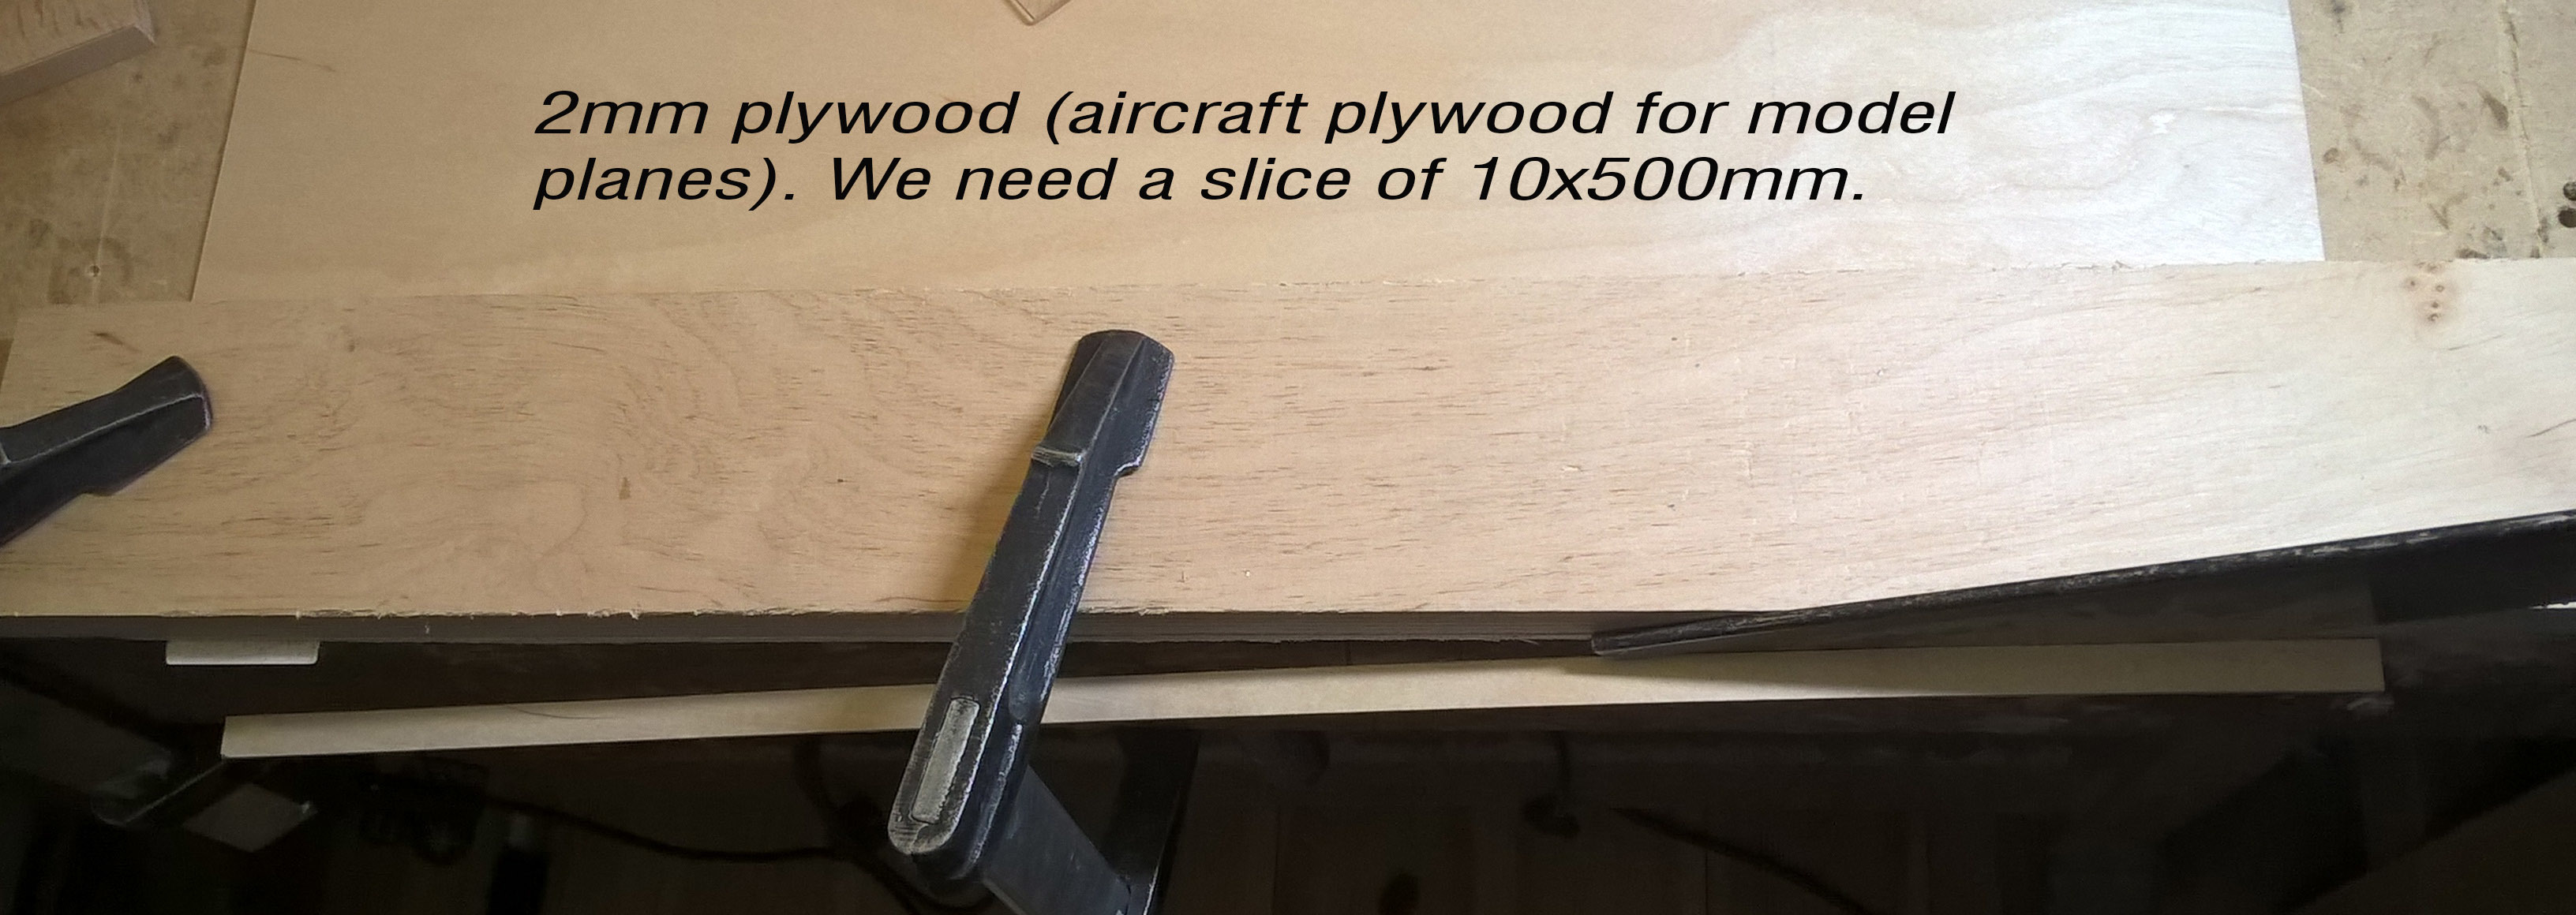
Now lets go in the details: We need - a sheet of 2mm Tufnol and - a sheet of 1mm Tufnol, - a hard wood profile (10x20) - and some thin plywood.
I use ply wood, but you could also use the 2mm TUFNOL!
No Spot Welder in the post today, so we have to wait a bit longer…
@trampa - thanks for such a detailed and pic heavy tutorial! Really great to see how you do it, and step-by-step so we can do the same. Great detail i can see being used for doing this across multiple boards, not just Trampa.
Appreciate a vendor such as yourself contributing so heavily and helping a DIY forum!
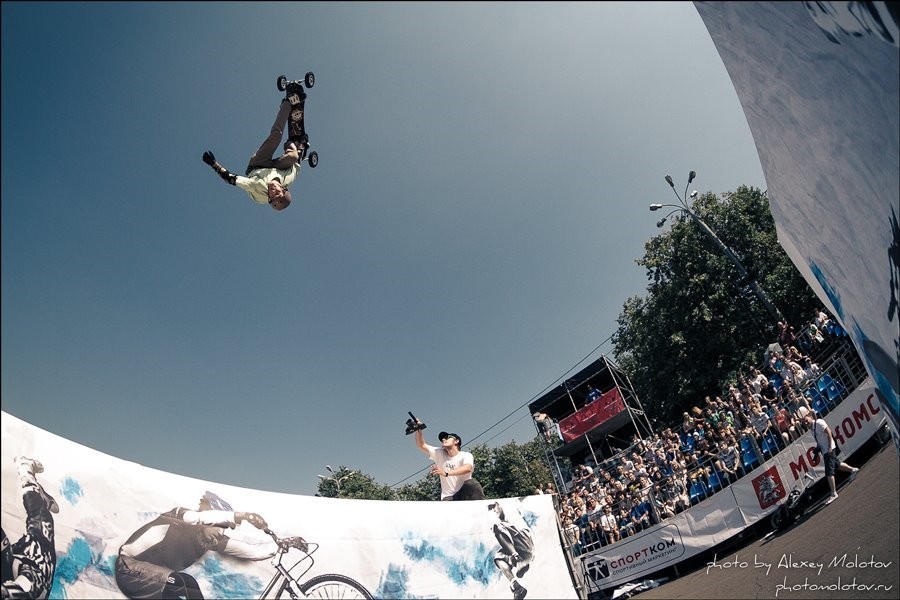
I enjoy building and designing stuff hands on. I really think E-Boards want a bullet proof battery enclosure and really well protected cells. So I try to teach everyone how to achieve this. Dan wants to do rail slides and go down the Ramps. Team Trampa always took it to the very edge… We want some E-Action!
This is for you @DanSkates :

Frank
Soooo good!!! The possibilities of a board sport with this new technology is just unfathomable. These pictures are amazing and I know for an absolute fact in the next couple of years all these pictures will be of dudes using eTB (Electric Trampa Boards!) going even bigger!! Imagine what it will be like not to need a hill and hit something only at the speed you can roll, and then after you’ve hit a spot not needing a tow but to just turn around and hit it again straight away…in the opposite direction! Where before you could maybe hit a spot 10 times in an hour you could now smash that spot 100 times in the same hour! Not only will this be more fun but progression will be faster - people will dial in harder tricks in less time. Hell, people could learn to hit kickers and rails on home made spots in their back yards or in the street as they won’t need as much space. This is the dream every rider has.
We are witnessing the birth of something very special…so strap in, power up your board and enjoy the ride! 
Great build.  Thanks for all the work you are putting into this, so every beginner can see clearly from the pictures how its done the right way. Looking forward to see that build finished. You will definitely have a lot of fun with it.
  I think the VMS will be the next big step after the VESC 6.0 for the best possible electronics in your build.
I hope I can continue soon. I need to nip down to a shop to get more silicone membrane and then I will finish off the hardware. Spotwelder turned out to come from china despite being listed as coming from Germany. I’ll get the Sunko 709 over from Nottingham. At least I know this machine works. It will arrive on Thursday I guess.
Cheers, Frank
The spot welder arrived on Thursday. Finished the battery and did some documentation for you. More soon…
Frank
Hell yeah man great work
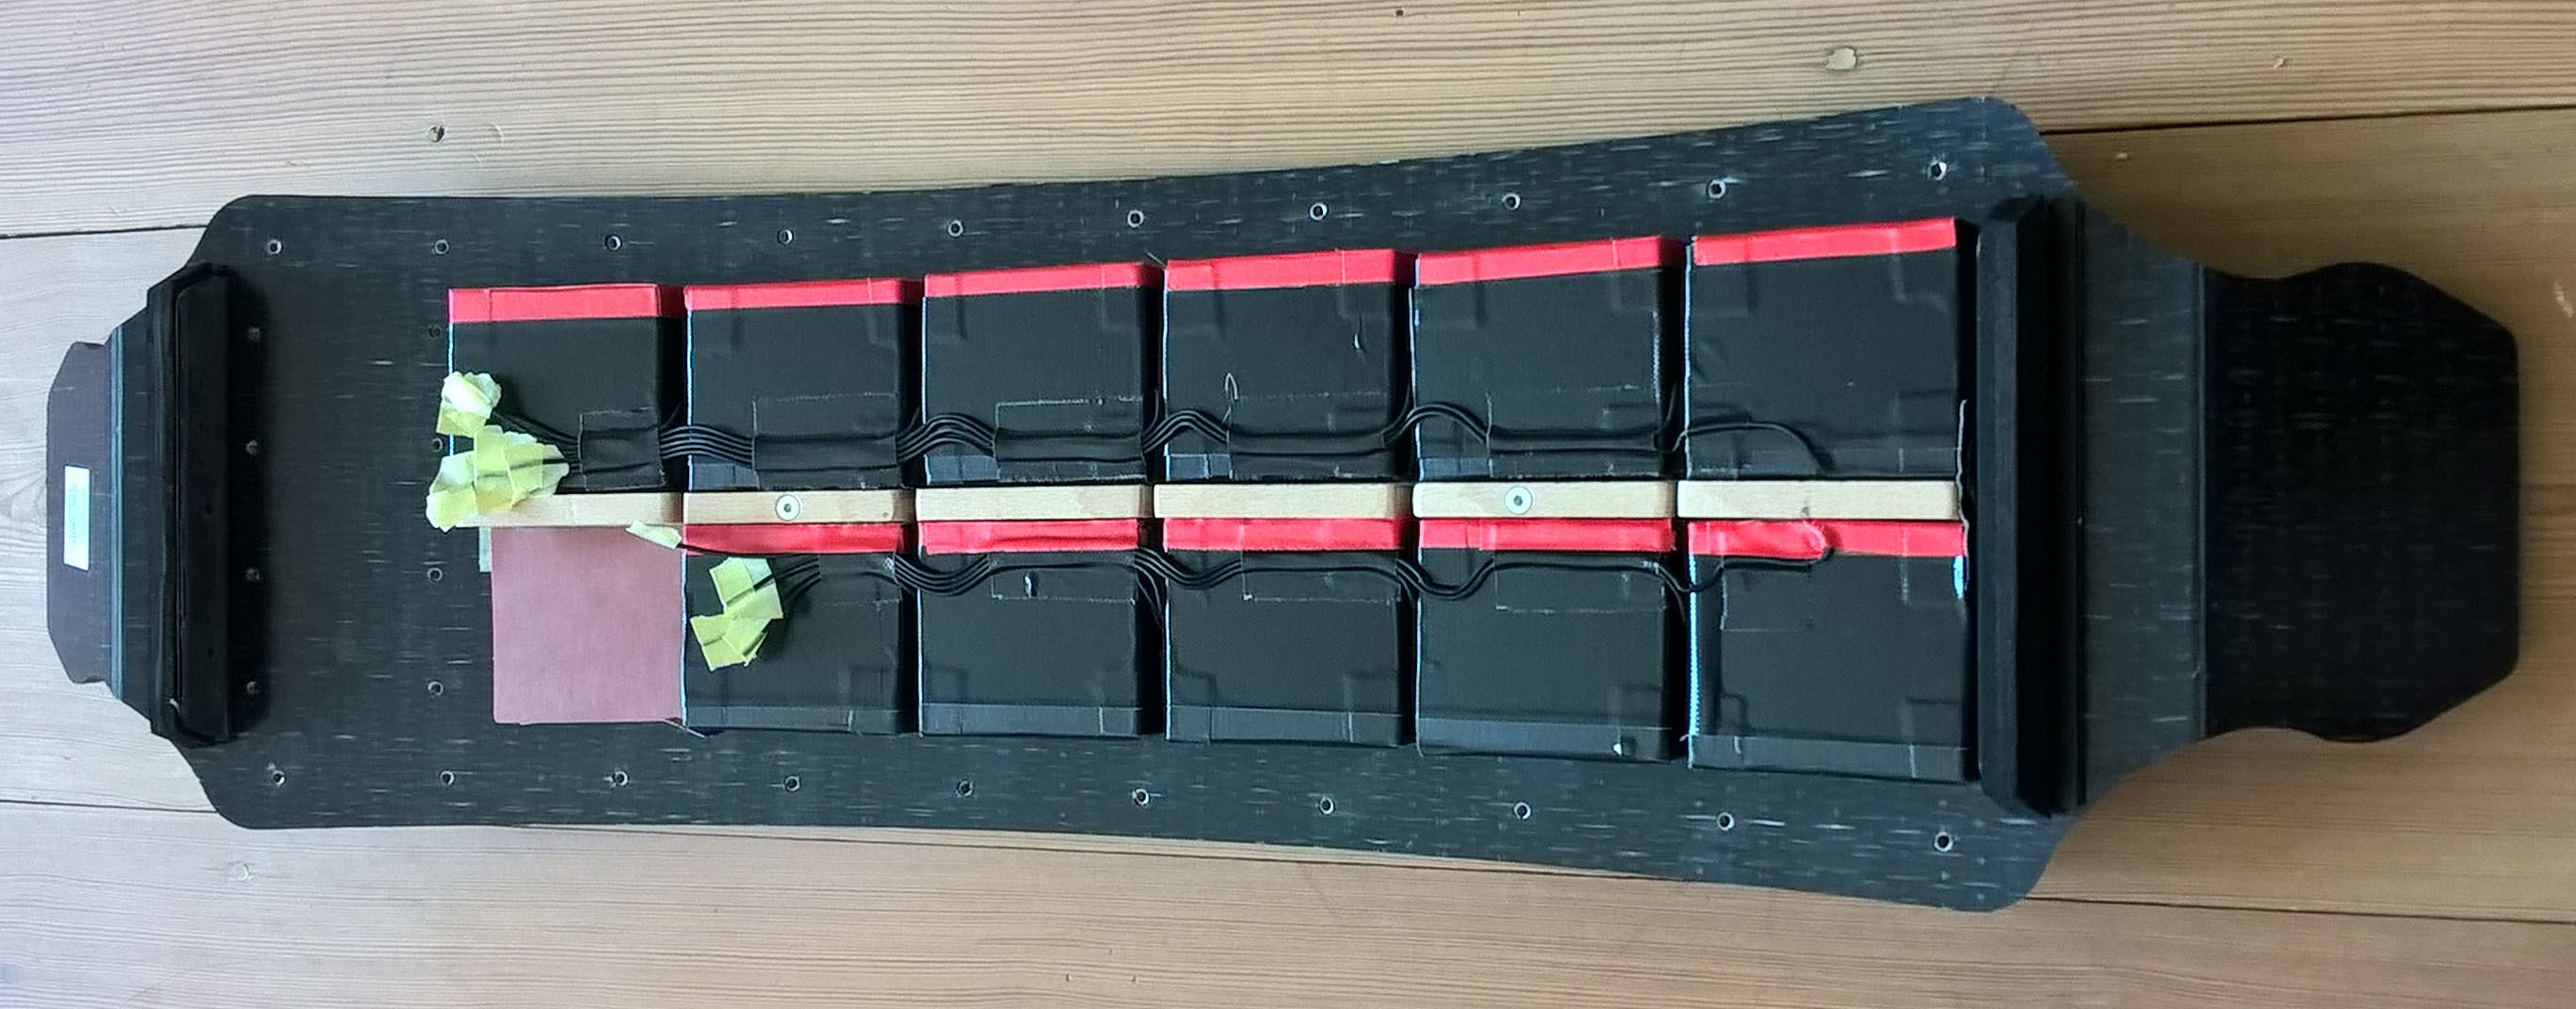
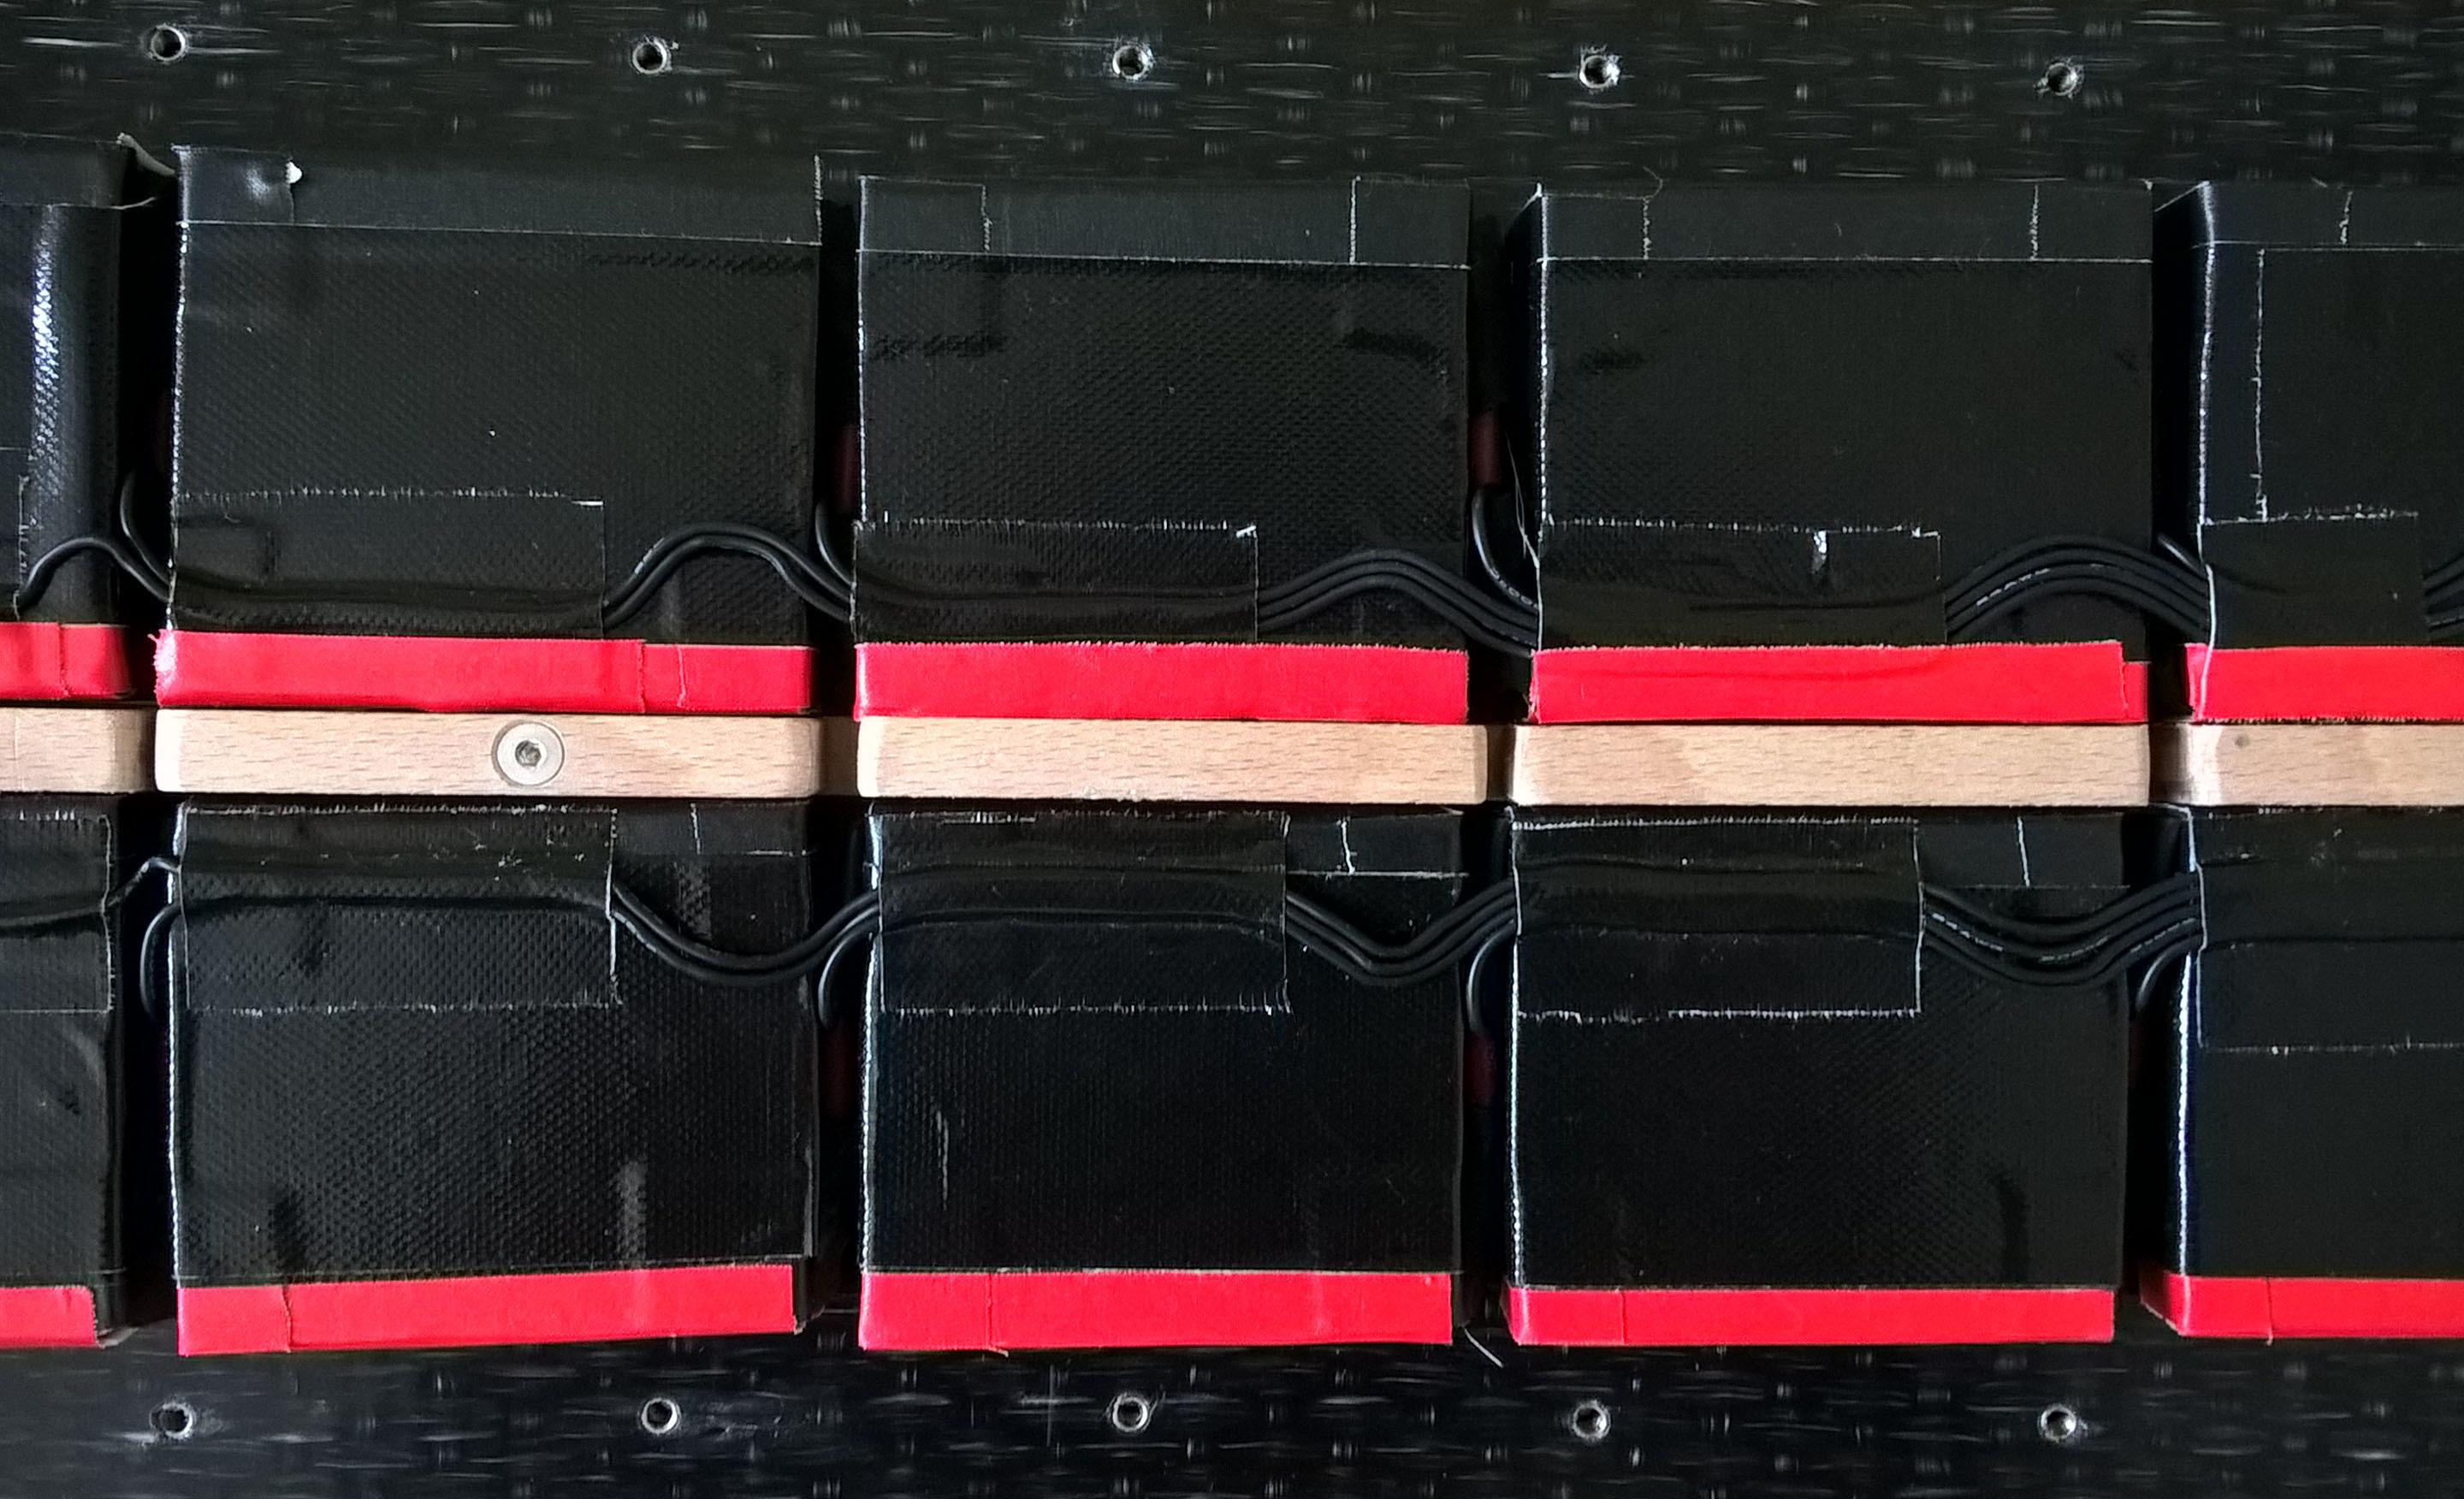
This is the finished battery - balancer leads still need the JST connector. I will do that once I made my final decision how to rout them. The positive poles of cell groups are marked red. The individual packs are rock solid, housed in a 2mm Tufnol shell. The Tufnol shell is glued onto the cells with Pattex. Cells are glued to another with Pattex. Pattex stays flexible when hardened and is dam strong.
I wrapped the perimeter of the cell groups with 1mm polypropylene strips. The centre spine is bolted onto the deck with 2 M4 x30 countersunk stainless screws, locking the battery back in position. the Spine is a bit prone in reference to the cell groups. Balancer leads are a bit longer than necessary to allow the flex - other wise they would stretch when the deck flexes hard.
Final space inside Housing: 60.10cm. Enough to fit 12S4P and two VESC 6.
The “End Bungs” from PVC L-Profiles are now reversed - the lower branch of the L faces towards the trucks. This gives me a bit more space on the inside.
I will post a complete walk through next week. After that I will do the wiring, truck mount, grip tape, M6 Inserts for bindings (top mount, detachable).
Once I have finished the build, I will mount 7" pneumatic urban wheels, 90 mm Stickies, 125mm urethane wheels and I will do a infinity MTB hanger upgrade, using 8" Pneumatics ( full MTB setup with bindings).
4 in one Board…
@DanSkates: DRS capable! No worries!
Frank
Hey trampa did you get idea from the Buffalo board that bends?
@trampa very nice tape u got there for wrapping the batteries! Could u shed some light on where exactly did u buy it?
It looks like ‘‘ductile’’ tape to me… and probably ‘home depot’ shops have something similar…
so is it just ‘home depot’ reinforced tape or something more special?
Does look very good when batteries are wrapped up in this black tape
Tesa Tape!
The wide stuff is a sort of Gaffa tape.
Frank
No, its pretty obvious you need to segment stuff if you want the flex. The slitting pattern is nothing special, its just that you overlay two patterns and shift them to the left and right.
For an MTB I would only drop in the slits on the side of the Box.
Frank
Sorry for the delay BTW, due to a shit storm I couldn’t really focus on the Board. I think now there is less brown spray in the skies and I will continue to finish the HW and post everything.
Cheers, Frank
Wer bist du, Mann?!  You keep everyone waiting