The NTM Prop Drive 50-60 Rebuild Thread

Okay, so as per the edited title, this will be the thread of all threads for NTM Prop Drive 50-60 rebuilds. Watch the space.

OP:

So after running my newly finished board (will post a build post soon!) for a few weeks, I’ve learned a lot. After the first run, I very absent mindedly left the batteries plugged in over night (didn’t have a power switch by that point), and I ended up overdischarging my 8s LiPo pack to below 0.5 V per cell. I ended up recovering 7 of the 8 cells, but the other one would only build up to about 0.9 V, and then it would discharge straight back down to 0.0 V in about 2 minutes.

In any case, I’m running two NTM Prop Drive 50-60 270Kv motors, one on the front right and one on the rear left. I noticed from the start that the rear was running way hotter than the front one, but I didn’t take much notice of it. Now running on only 7s, using an APS 120 A Twin ESC, I must have pulled too much current through the rear motor going up a hill, and I have very clearly burnt the windings in at least two places, verified with a multimeter. In any case, the motor still runs, albeit a bit less smoothly than the front motor and puts out about 20% less power and gets really hot.

The bearings on both motors are also absolutely stuffed.

With zero help from the well known Hobby supplier that I got these from, either in terms of replacement/money back for the one motor that was clearly a dud from the start, or in terms of any indication as to when they will be getting stock of the 50-60s again so that I can fork out for replacements, I’m forced to make another plan. Either I can get some more expensive work alikes, or get a set of bigger motors, which would necessitate a redesign of the mounts etc, or finally, rebuild the motors.

I’m going to go for the option of rebuilding the motors. I plan on fitting some high quality bearings and rewinding the motors. DIY. #punk

I have a few questions, for anyone that has any experience with rewinding motors and eboard setupts.

1: Is it worth it to try and rewind these motors for a lower Kv and/or higher load capacity? Does anyone have any ideas as to what sort of winding spec I should go for to achieve this, off the top of the head? I could spend some time working it out, but I may just rewind the motors as is.

Which brings me to my second question:

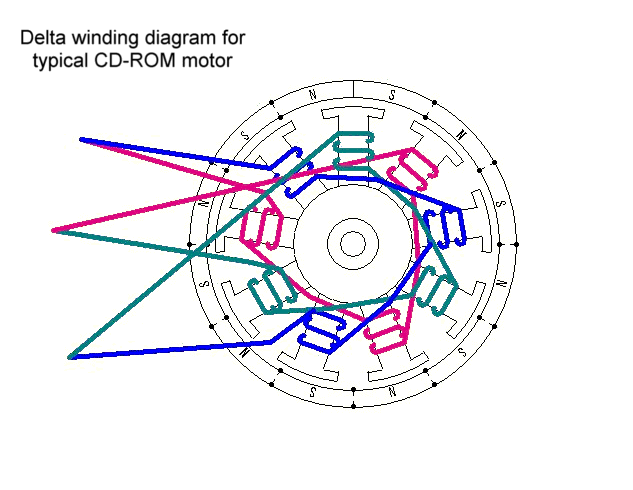
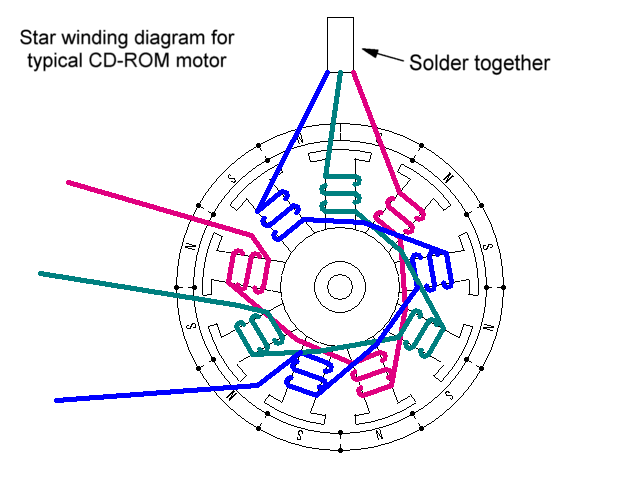
2: Does anybody know any details as regards the winding configuration on these motors? I’d like to know what I’m getting into before I pull the thing apart, just in case I mess something up and can’t work it out myself.

I’ll be looking for: termination style (wye/delta), winding pattern around the stator, number of turns, wire gauge, number of strands per wrap. That’s probably about it.

Would be great if anyone has this info!

3: Would it be possible to use a thicker/thinner gauge of wire, with less/more strands per wrap? What are the pitfalls here?

I would imagine to get the same performance out of the motor, I would need to keep the number of turns and the cross sectional area of copper of each turn the same. Is this correct? I would imagine that thicker wire would be harder to get a neat wind around the stator, due to the fact that there is more negative space around the wires for the same cross sectional area. Thicker wire would probably be more durable though. Does anyone have any advice here?

That’s it so far! Need to get myself a heat gun so I can pull the stator.

2 Likes

Humm I’ve got a few “Paper Weights” at home…will follow this thread …

I was looking for some that could fix them for me…but no luck …and I’m not abt to do it myself…

Hope you get your answers :bangbang:

All the best mate

Seeing as i just finished a rewind of an R-spec motor, i’d say go for the rewind, it’s really satisfying when it’s done.

I’d suggest using a single thick wire for your sanity’s sake, doing even two wires is a royal pain in the ass.

And i found a really neat way of removing the stator diving through countless rewinding threads. Remove the bearings, put it in the freezer for and hour or so and then while holding the stator in your hand (use a glove) just whack the bearing tube with a hammer. Make sure you find a spacer or similar item that is large enough to fit over the rim of the bearing tube, but not so big it’ll hit the stator. Will need to hit it pretty hard for it to loosen up.

No idea what number of turns or how thick the wires are in that motor. So you might have to do what i did, count the number of turns as you unwind the old wires. Then calculating the total cross sectional area with the number of strands and their respective thickness.

I used this calculator:

And i used this for determining how to wind it: http://www.bavaria-direct.co.za/scheme/calculator/

And this might be of use as well if you manage to figure out the original specs of the motors: http://www.rcgroups.com/forums/showthread.php?t=2228201

2 Likes

I need like a Lego schematic or something because I’m so daft lol

I’ve never rewound a motor, but i have a couple that could benefit from it. I’m watching eagerly as well.

1 Like

Thanks for the encouragement and advice. I’ve never done this before, but I can get most things right so I’m sure it’ll be okay.

I’ve just got some new bearings. A quality main bearing and a Chinese bell end bearing (it’s pretty much exactly the same as the one that is stuffed). I’ve ordered some higher quality bearings that I’m getting on Thursday.

Thanks for the tip re. stator pulling @Iceni, and thanks for those other resources.

Was wondering what the best way to do that was. I figured trying to shrink the bearing shaft was an idea, but there is a ton of terrible glue on the main bearing end that I was planning to heat up and loosen. Do you think that will be a problem with the freezing method or will it crack off nicely? I want to try and preserve the winding details so I can see what’s going on in terms of termination etc.

I’m going to put another coating on the stator as well, just in case there are any bare metal areas.

Will also definitely go for one thick wire. Makes much more sense. I’d imagine the terminations are a mad las with multiple strands. I wonder why the Chinese don’t do that?

Will definitely keep this thread updated, as I’ve found zero info regarding rewinding this motor and it’ll be a valuable resource I bet.

As regards KV, does anyone have any ideas what effect the amount of copper has on this, directly? More copper = lower Kv? I’ll Google anyway. Just wondering if anyone has any ideas off the top of their head.

This thread is super cool. I’ve been thinking about rewinding motors too. Couldn’t be much more difficult than rewinding guitar pickups. Just need to get some dead motors, now…

@Ulfberht Exactly?! I’ve done that before. And wired my own inductors for a DIY studio ref power amp. What could be so hard?!

These motors, apart from their super shart stock windings and bearings, are beasts for the price.

Although, it must be said, extra work and supplies required would probably make them cost twice as much though. Meeep. Anyway, can’t get them, can’t afford the “big boys”, can’t afford to redesign. DIY. I’m punk like that.

1 Like

The stator on the r-spec I pulled apart was glued as well, but after a number of good hits on it it started to move.

The more copper you put in it the lower the resistance becomes, which leads to less wasted energy to heat. It’s the number of turns and termination you put in that determines the kv. The reason why the commercially wound motors use thin wires is probably because they use machines to wind them and I doubt they’ll handle the required thickness for single strand.

1 Like

That makes great sense.

So more turns is less or more Kv? For a constant termination style and winding pattern.

I’d actually dig to lower the KV a bit. Must needs torque, and I’d prefer to lower my top speed a bit. Geared for 50 km/h tops, which is too much, and I’d rather not modify my pulleys as what I have is a happy median for ground clearance.

Dang dudes…you make it seem easy…how the hell am I suppose to figure out how to put it back together…I need re-winding brushless motors for dummies book…better yet video … Who is up to the task of taking it from A to Z for a slob like me

1 Like

More turns lower the Kv. And if it’s anything like the r-spec stock wind, it’s terminated as delta, which from my reading seems to be standard for most commercially wound motors. So you could use the same number of turns and terminate as star to lower the kv as well.

1 Like

Thanks for the info!

I’ve read that for the same wind, termination from delta to wye will divide my Kv by around 1.7. That’s probably too low for me as it will end up at around 150Kv. Will probably opt for 1 or two more turns rather, if I can fit it them in. Only going to tear down the motors in a couple of weeks, as I’m under some time pressure at the moment.

Will keep this thread updated. Thanks for the help so far!

Just do the LRK wind and terminate it delta. Easy. Just watch the starts and ends

U can also raise the kv in other ways with the airgap or magnets. One way to raise ur kv is cook ur magnets

More wire means more resistance. Ultimately u can have the same torque out of any kv motor, either a many turn low kv motor with lots of resistance and few amps, or a few turn motor with thinner wires with less resistance but u need to put in more amps to get the same torque. Ultimately it balances out and u get the same heat to torque. So u could run on 5 volts and a 500kv motor or 50 volts and a 50kv motor and get the same performance…except I think with the higher voltage u can get more power as u can push more amps, but maybe not necessarily true as it would be a very low resistance motor

Man … it looks like a pain to do … It’s like knitting

1 Like

Stare at the diagram I posted for a bit and when it clicks you’ll realize it’s simple. Just wrap a wire clockwise around a tooth, skip to the compete other side of the stator with the same wire and do it counter clockwise. Repeat three times. Just remember to watch the “starts” and “ends”

Finally got a chance to pull my first motor apart.

This is what a deconstructed NTM Prop Deive 50-60 270 Kv looks like.

I used @Iceni’s tip to pull the stator from the base. Stuck it in the freezer overnight and then took a 1/4" 9mm socket and extension to the spindle bearing side with a hammer. Worked like a charm! Thanks for the advice @Iceni.

I’m going to do a photo documented rebuild of the first motor, and then I’ll make a ‘for dummies’ video of the second motor rebuild when I’ve learned what I need to in order to do the second motor fairly quickly.

More updates soon!

2 Likes

Man!! I can’t wait so see this build!! I’m seriously on the edge of my seat!! Are you going to build a winder or just wind it all by hand?

@Ulfberht, I appreciate your excitement. I’m pretty amped too! I’m going to wind these ones by hand I think, as I’m going to opt for a single wire wrap, which should be fairly easy by hand. Also, rewinding two motors doesn’t justify me building a winder for the moment.

Tearing into the phase wire connection, we can clearly see that this motor is delta terminated, and, fucked.

If you look at the image above, you’ll notice that the ends of the coils are connected, similar to the diagram below. You can also see how stuffed this motor’s coils are. Chinese poo wire. :wink:

I’m going to keep these motors delta terminated, as wye terminating will drop their Kv a bit too low, reducing it by a factor of 0.58 or so to about 160Kv, which is verging on too low to be suitable for an eboard. I will rather add another turn or two (when I figure out how many there are stock) to drop the Kv a bit. I’ll aim for a Kv of 230 or lower.

For those interested, a wye termination looks like this:

More soon.

1 Like