I hope you insert the magnets correctly in the thumb wheel, otherwise is the hall sensor probably
When I use the thump wheel in the normal mode is see bar going up and down so it seems to work
ah ok then it’s weird.
The bar will still go up and down even if the magnets are in backwards. The bar just moves in the opposite direction. Try editing the min/max/center and see if min is a number between 0 and 200 ish. That’s roughly where it should be
Ahhh I think one magnet is wrong. In normal position I can switch up the pages but to switch down I have to turn the wheel upside down. So I think I have to change one magnet? Also the double Nummer for pages like 11 won’t fit in the rectangular frame
Min is 0 Max is 1023center is 512
in mine max is 865 I think so almost there.
So are specific values for min max center which I adjust or how does it work? I need to switch one magnet I think 
no no the values are subjective tot the magnets you have, impossible to have same magnets strength. IF the wheels move correctly in both the direction should be ok.
OK. So it’s just the magnet I have too change. Man building this remote was an adventure😁
1 Like
it’s a learning curve. Well took you two days, not to bad.
That’s the problem. U just build the remote without understand how the components work together and how the code is implemented.  but u ll get it after a few tries.
Those are the default values. If you’re running the dev code the OLED screen will display the ACTUAL hall sensor values while allowing you to adjust your min/max/center. If you’re running the master code, you won’t see these on screen. You’ll have to enter debug mode inside arduino software and view the output there.
Yeah I’m more the mechanical guy. But even my two IT guys where confused (but they heard of vesc and e skate the first time)
It’s really good to experience how helpful people in this forum are 
Without rey8801 I would even have a remote or motors 
2 Likes
So I used the dev version with the latest uart… Is it normal that I don’t have written words in the settings just can change the values via 1 2 3 etc
And the doubled numbers won’t fit in the frame.
Or is it because of the dev version???


Is there a way to make this remote able to change modes? Maybe some programming?
That is not the newest development branch. You have to update the remote to the latest version.
3 Likes
Ah damn. Thank you
I just found this arduino pro mini clone. There is a 3.3V/8MHz version for $3.42, so price range similar to arduino nano ATmega328p ($2).
For the esk8 remote this is interesting because if we use this arduino we don’t need a 5v booster anymore + less noise when using the nrf transceiver.
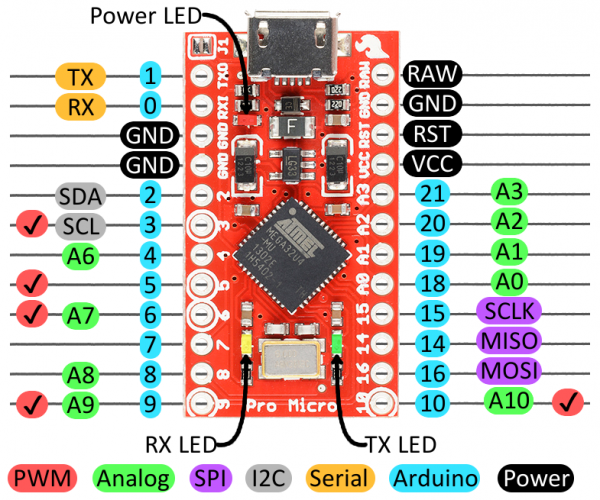
RAW is the unregulated voltage input (up to 12 V) and VCC is the voltage supplied to the on-board ATmega32U4 (3.3V, 8MHz). A supply going into the ‘RAW’ pin will be regulated down to the correct operating voltage of 3.3V which means the lipo/tp4056 can be attached directly without a 5v booster. I should try this for the next esk8 remote I build.
BUT u ll only run in 8Mhz… do u know that’s enough? Or just make a try and error?