Hi! since I am also going to use almost the same hubs, could you share how you connected the hubs with VESC/ focbox? With picture is probably easier:grin: Did you also connect the sensor cables? Thx a lot
Yeah sure. I also use a can bus connection and blue tooth module.
Unable to connect the sensor cable due to different size connector. I plan to buy the adapter plug from here:
products/vesc-sensor-wires
I believe they are the right ones.
For the sensor cable you can also buy just the jst ph 6 pins female end and solder it instead of the 5 pins present. One pin is missing because the motor doesn’t have the temperature sensor. Although I do not know the order of the cable on the Focbox and the motor. I know that yuo need to knoe just the ground (usually black) and the 5V (usually red) the other ones can be randomly placed. Otherwise you can also solder the cable directly on the focbox 6 pin male end. Concering the bigger cables do you know what do they refer? I mean their role on the focbox becaue I have a different vesc. Thx a lot
Anyhow the sensor cable you wanna buy is not correct for this motor. if you want an adapter has to be a jst 1.5mm 5 pins for the motor side. But I would say that is better to replace directly the cable to jst ph 6 pins for the focbox.
The 3 fase wires to motor?
No, someone told me it didn’t matter. Just switch them around until it works.
As you can see I have the master which is the bottom one in my case in the order blue, yellow, green. I had to to switch green and yellow on the slave to get the same direction.
I don’t think it was necessary though for I think you could also reverse the direction in the vesc tool which is what I am using with ackmaniac firmware 3.1.
Ah ok cool. I thought they have a order, but easier like that. Thx
I read through all the posts and I was still confused a bit about the focbox installation. So here is my quick guide since I too was looking for one but could not find any and was very weary when I first tried it but managed anyway from the following links. Happy riding everyone.
What I did in the end for the ackmaniac tool and firmware was install the ackmaniac bldc tool first from the following link.
upload firmware 2.54 in the tool from this link.
Since I am going dual I have the focbox’s connected via the canbus. The receiver for the remote is connected to the master focbox. The Bluetooth UART module is also connected to the master focbox The antispark is connected to both focbox’s via the parallel, and then connected to the battery. Be aware that when you connect the power to only one focbox and the focbox is connected via canbus to the other focbox it wil/might blow up the non powered focbox.
After this I connected the master focbox to the computer, started up the bldc ackmaniac tool which now has the firmware available of 2.54, and uploaded this firmware to the focbox. Repeated the same for the slave focbox.
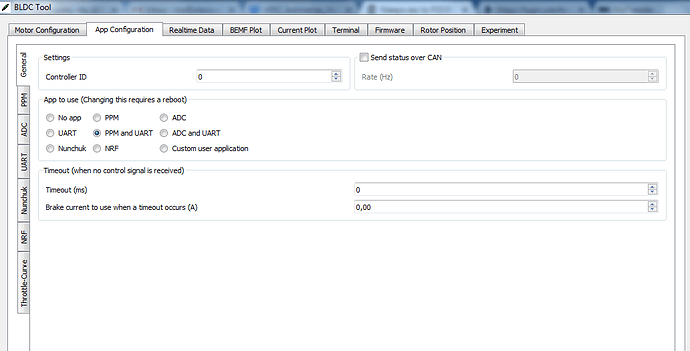
Master focbox settings: -App Configuration
I then went back to the master focbox and after I connected it to the bldc ackmaniac tool I made sure to id it as 0 for master, and since I am using the bluetooth module and nano x remote I also selected the PPM and UART option. For slave you need to set controller ID to 1 and check Send status over CAN as well.
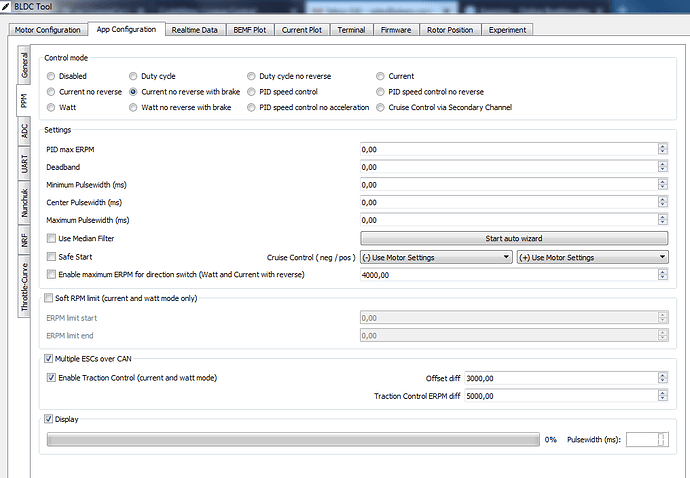
Then for the PPM page I went for Current no reverse with brake, and selected the Multiple ESCs over CAN option. For slave you do not set this option of Multiple ESCs over CAN option. Use the auto wizard for the remote calibration.
For the bluetooth module connection you need to enter the baud rate for value 115200 or 9600. It depends on which app you use. I don’t know which was for which.
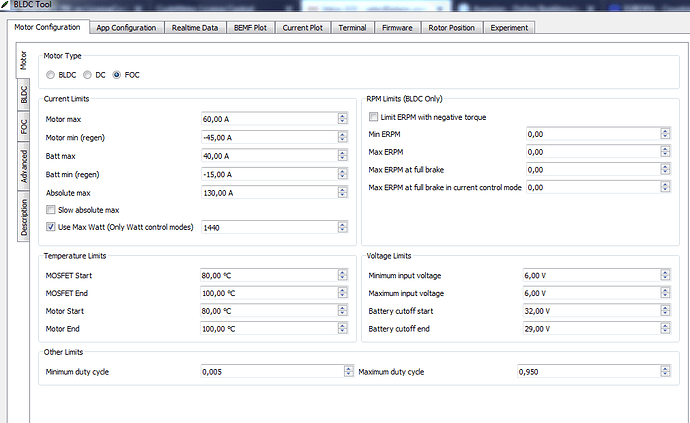
-Motor Configuration
I set the motor type to FOC, and played around with settings but I consider this safe so far. Haven’t done any long range testing yet (It is too cold to enjoy it to the max). Use the same setting for the slave here.
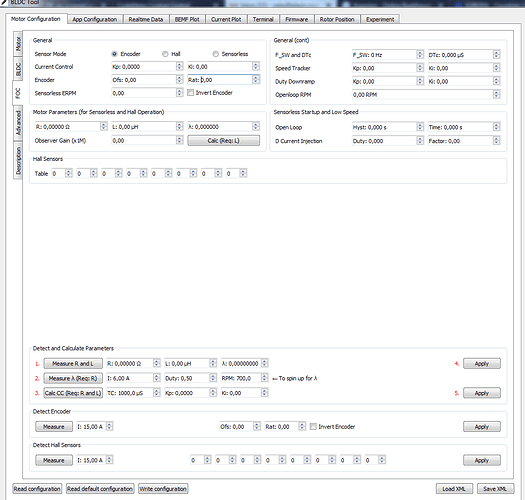
On the FOC page go through the steps 1-5, repeat for the slave.
Hope this helps someone. I am currently running the vesc tool which is from ackmaniac which you can find from the same link at the top. This tool already includes the firmware 3.1 so once you have firmware 2.54 on your vesc’s you can download this tool and upload the firmware to your vesc.
If anyone wants to see those settings let me know and I will add it. If anything isn’t clear, message me and I will try to help.
Nice guide. As you mentioned, you can upgrade to 3.1 firmware straight from the Esc Tool. I don’t think you need to load the 2.54 firmware, unless I’m missing something?
Thanks.
Yeah that may be true. I am not sure. This is what I did. If any one can confirm this for sure I’ll edit it.
I read those posts many times over and it just wasn’t clear to me. So I took what I thought was the safest to do since I also read so many posts about people with faulty/broken vescs.
Nice guide…I will ask yuo something for sure in the future qhen I will have to do the same! 
what would i do different for single focbox with nano x remote and planning use bluetooth module in the future but not now…iv got as far as uploading the 2.54 firmware to the focbox just now
Do you wish to run it in foc?
You can keep it the same except for unchecking the box for multiple esc and traction control. Other than that you still have to figure out your current limits which depend on your motor and battery.
ya hoping run foc on the focbox since its a sensored 6374 motor with 36/14 gearing and a 10s4p 30q battery and a nano x and bluetooth module soon
Hi! I would have some questions. I read all the thread but something is still not clear to me. I need to configure two VESCs 4.12 via Canbus. The VESCs have the ackmaniac’s firmware and I will use the customize ESC tool he programed. My questions are mainly about the initial steps: 1- Do I need to set up both vescs separately and only later connect them through the Canbus cable? Or can I already connect them together, then power on both of them and first connect the master to pc configure it (specificy ID0, send status over Can, multi esc over Can ecc…). Once the master + receiver is tuned, connect the slave VESC to pc ID1, send status over can and no multi esc over Can. Which one is correct? 2- Concerning the remote configuration, the receiver has to be connect to the master VESC, but how do I configure the remote on the slave VESC? Is it possible do it through the Canbus connection? 3- Do I need to reboot the VESC between the passages? 4- Ackmaniac’s firmware is based on watt instead of current. Where does it apply the max watt at the motor or VESC (battery) current? I mean usually we calculate the watt as 60A battery discharge x 10s x 3.7V = 2200W so 1100W for motor available. What current does the program take into account? The battery or the motor? Because the current at the motor level can be higher then the one provide by the VESC.
Sorry for the long questions 
The canbus is really only there for the vescs to communicate with each other to receive signal from remote and Bluetooth input. Maybe more but can’t think of it.
- Both ways work. Either way you will have to connect each vesc separately to the computer to configure them.
- You can connect the receiver to either vesc. The one that it is connected to is the one where you need to calibrate the remote.
- Don’t know. I connect the vesc then simply read settings first when I have them set up already, then make changes and write them. Then disconnect.
- It is max watt of the motor.
Thx for the fast reply. So So I can power on both of the vesc and then just switch the usb cable to connect them to the pc, first the master then the slave. All passages briefly: 1- Connect both th vesc to the battery (can I use my own 10s battery right?) + motors. 2- usb cable to master vesc --> ID0, send status over Can, multi esc over Can, motor max, battery max ecc… Select ppm + uart (if you have bluetooth) and configure the remote. 3- motor detection and adjust values. 4- Apply all the setting and move to the slave vesc. 5- Connect the canbus cable and connect the slave vesc to pc --> D1, send status over can and no multi esc over Can. Select PPM (do I need to select uart as well if I have bluetooth or only at the master side is needed?). At this point do I need to do the remote configuration or the master send the remote setting to the slave? 6- Motor detection and adjust values. Now both of the motors should spin. right? 7- Apply all the setting and enjoy!
Thanks for the help!
You can configure the slave first or the master. It doesn’t matter.
-
Yes connect the vescs to the battery with motors attached if you want configure the motors too. I do use an anti spark with power button for safety of the vescs.
-
This is correct except for the send status over can which should only be enabled on the slave.
-
Yes.
4,5. Yes do the slave and only check send status over can. Ppm uart checked on both to get data if using Bluetooth module. Remote calibration is done only on the vesc where the receiver is attached to.
-
Yes.
-
Happy riding
Perfect, I finally see the light a that e ed of the tunnel! Thx you very much! Now I need only need the motor  …
…
Hi! I thought it could interested you.
Ciao ciao
What do you call the connectors on the meepo’s motors phase wires? Did you have to change them to connect to the focbox?
https://cdn.shopify.com/s/files/1/2096/3333/products/7_1800x1800.jpg?v=1520569102
Those are bullet connectors. No Focbox use the same size. I can’t be sure but anyhow Focbox comes with 3.5mm connector. Check for your motor, but should be the same.


