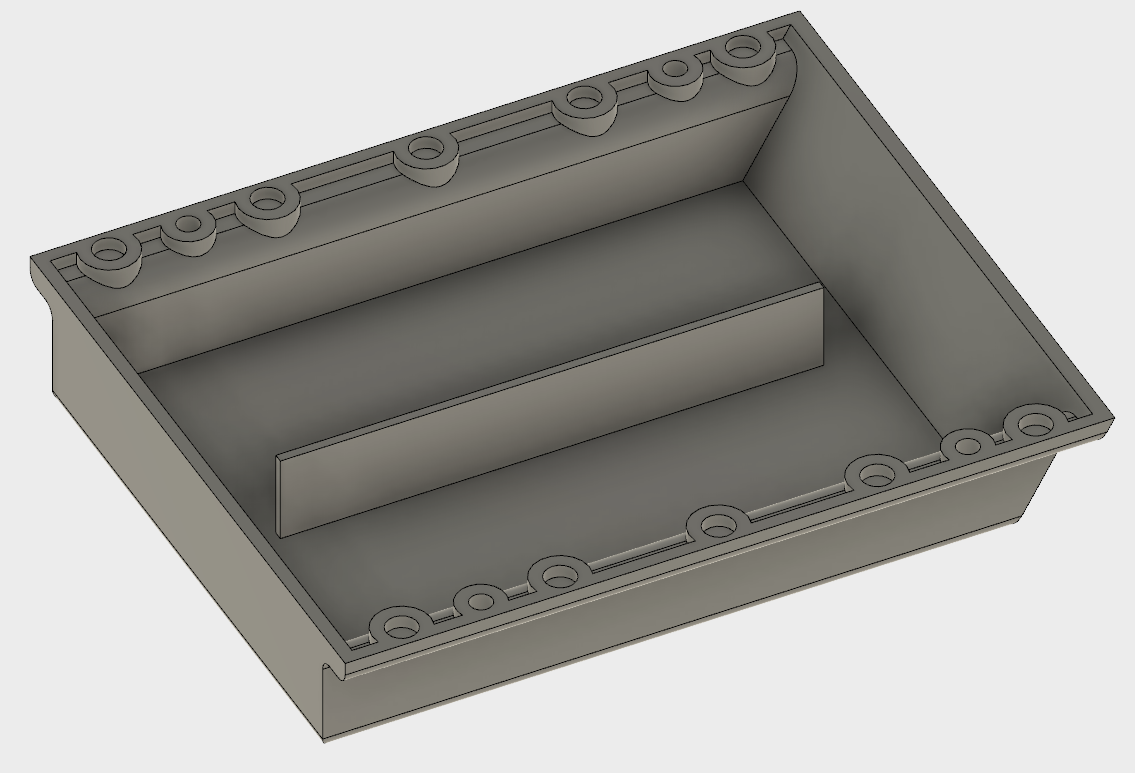
And here’s the updated version
- 5 magnets on each side
- 2 holes on each side for clevis pins
To-do:
- holes for balance charging port and xt60
- hole for XT90 switch
And here’s the updated version
To-do:
Sweeeeeeeeeeetnesssssa
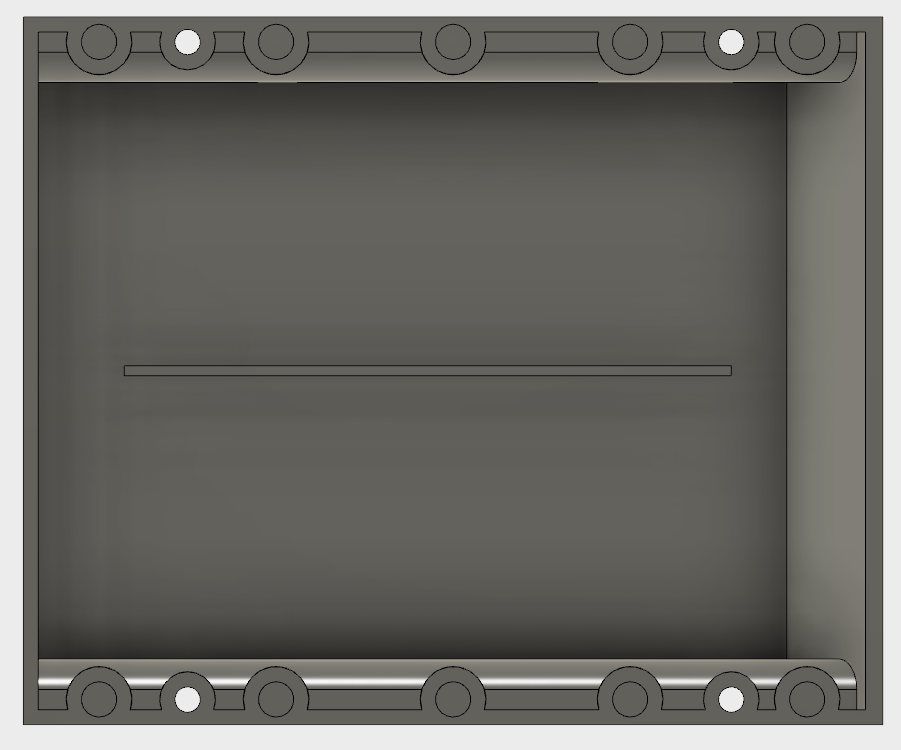
New version I made it so that there’s a smaller part (the front) where all the cables will stay, and which will stay permanently connected to the deck, and a removable lid, that can be secured by either magnets OR clevis pins. I’m printing the first front part now. The connectors are: XT60 and 6S balance charge connector.
To-do -voltmeter -add curved deck outline so there’s no gap when the enclosure is sitting close to the deck
Do you use Solidworks? Sorry if you have already said this.
No, using Fusion 360.
Current iteration. Now with space for a voltmeter, an XT60 port to charge and connect to VESC, a 6s balance port, and an XT90 loop. I’m printing the larger piece now and will test fit.
Very cool, I also am working on a 3d printed enclosure (Not nearly as well designed). I solved the delamination issue with some ABS sludge on the heated bed, (mix of acetone and ABS filament). Magnets are very cool solution to mounting. Currently I am using threaded inserts that are used in furniture but I have no idea how long those will last. Do you plan to connect the two boxes with wires across the board or are you routing them a la boosted board style? My first enclosure had two 10 AWG wires that ran down it and I hated it, so I am just hoping that the ABS is flexible enough to bend as one box instead of two.
Here is the first generation, looking to reprint when I extend my 3d printer to a 300x200mm build size.

I haven’t decided how I will route the wires between the battery and VESC. I have just made extensions to my box so if I need more space I can just print another one. Also, if the deck bends, the top of the boxes can open a little bit.Note that no components will be fixed to the enclosure, everything is stuck to the deck itself. See below for diagram.
As for material, I have printed it using PETG which is fusing each layer very well and it doesn’t have the shrinkage issue of ABS.
Yea my deck flexes a bit too and the middle does seem to split if I stand on the middle of it. I have been toying with the idea of making a single enclosure with two halves that are connected with some flexible rubber so that the very middle of the enclosure is flexible yet still watertight.
That’s a nice enclosure! I designed something similar in 123d and am working on a F360 version… This is very well done. How long have you been modeling?
hey @JLabs thanks, I am new to modeling. Have designed only small items so far, but watching a lot of youtube videos and trying a lot of stuff. I guess Fusion 360 really made sense for me so that’s what I’m using. And it’s free 
Still my biggest question is how to attach this to the deck. I think I’ll use 6-32 brass wood inserts. But I need to modify this design so that if I want to add more of the middle sections the holes will continue to line up. But I have printed already what you see there and I’m lazy to do all the calculations for this…but I think I’ll have to do it so that I only have to drill the deck once and at regular spacing…
I used shoulder head cap acres, they are flush with the deck and I have nuts on the other side of the enclosure
Although it is nice to have threaded inserts on one side, from my experience go with the T-nuts like JLab uses, brass sheers really easily and when screwing mine in about half of them snapped and they almost go through the thickness of the board anyways.
thanks @JLabs and @jakobnator. I have no experience with inserts but if they are not enough then the T-nuts are my next choice
Leo
Continued at my build topic http://www.electric-skateboard.builders/t/untitled-sector-9-faultline-torqueboards-trucks-tb-motor-230kv-torqueboards-v4-mount-6s-vesc/3085
Good job on the 3-D printed enclosure. Doing it in sections so it will flex a little as well as being able to lengthen it in the future is a great idea. You could also add some sort of O-ring or rubber gasket to keep water out. I want to do something very similar for my build. How long does it take you to print the enclosure?
I have been also looking for a solution for fastening enclosure to the bottom of the board. I was thinking of the “DZUS” fastener. They are used for quick panel access in racing applications like motorcycles, airplanes, etc. No tools necessary. Just a spring loaded knob. I provided a link below.
Any chance you could share the file so i can print it? My design looks like crap
Wow, that would be really nice to pop that baby open quickly.
Hey man, that looks awesome! I was wondering if you could share the CAD files with me. I am currently designing my own enclosure, but I am struggling with the slots in the wall for the various items. I was thinking that I could just look at your files and copy the ports. That is all I want. If you could do that for me, I would really appreciate it. Thanks.