how do they compare in rolling resistance?
How much PSI did you inflate to?
I pumped mine up to the limit, but then they are as hard as my PU wheels, which kinda kills the comfort part.
I was asking ervin, because he said it feels like brake assist.  I think they go to max 75PSI, and yes, they become hard as a rock. They came to me pre-inflated and I thought they are going to shoot out the valve at me when trying to deflate them.
I guess the comfort also is related to the riders weight too… My 100 kilo ass will compress the tire way more, than for example a 75 kilo guy. Just a theory.
Max… Like 60? I forgot…
Haggy vs AliExpress 6x2? Day and night difference…
1 Like
I weigh the same…
What’s the pressure in your Haggy?
Maxed out too… I think 60? Again I forgot…
I will maybe pimp my wheels with a new tire and keep the rim. Maybe i should have bought the stormesk8 wheels… This is what i found in germany. https://der-rollenshop.sportkanzler.de/navi.php?k=112&suche=&Sortierung=3&af=0
Another culprit I found during this evening of playing around: the spacer is shit. It’s too long. The bearings centers get pushed out once you tighten the wheel. Still unsure how much to take off, but maybe somebody with better tools could check this too.
ah damn, this makes sense. They rolled better in my hand.
That maybe by design, given that the other side of the centers would be pressed when you mount them on the axle and tighten them? That way it remains centers during operation. Otherwise, they would get pushed inward into the wheel. Make sense?
If I were to design a wheel, I would do it that way.
The issue is, both bearings are pressed inside the rim unevenly. Especially apparent when you tighten the wheel together and on the axle. The spacer shouldn’t be so long, that one bearing is offset by 1mm, not making full contact with the wheel. You can try and take one rim apart and look how they are seated at the moment.
Photo? I can’t imagine it.


You can see that one has the gap.
I have frozen one part of the rim to ease the removal of the bearing.
I pulled all of my bearings out by using a printed PLA “puller”.
All you need is a M8 bolt, preferably on the long side, nut, and a wide metal washer, might be not needed.
I can upload the STL if it is needed.


Best part, it did not hurt the bearings at all. Next print will be a seater/press for sure.
Bearing stats: 3 on the verge of locking up, complete trash 3 spin harder but tolerable 2 spin perfectly
8 Likes
This is awesome. Please do share the files. It will be very useful. BTW, what’s the price of the bearings?
3 Likes
Here in Lithuania, bearings cost from 0.10€ to 43€ per. I will try to find out what kind of brand I should get. Generally I will try to keep around the price of 2.50-3.00€ per bearing.
I will upload both STLs when the press is designed and printed.
Okay, press is done and was way easier than I thought. It presses way better than I thought and eliminates the gap no problem.
Long instruction post ahead!
This is all you need to use the “tools”:
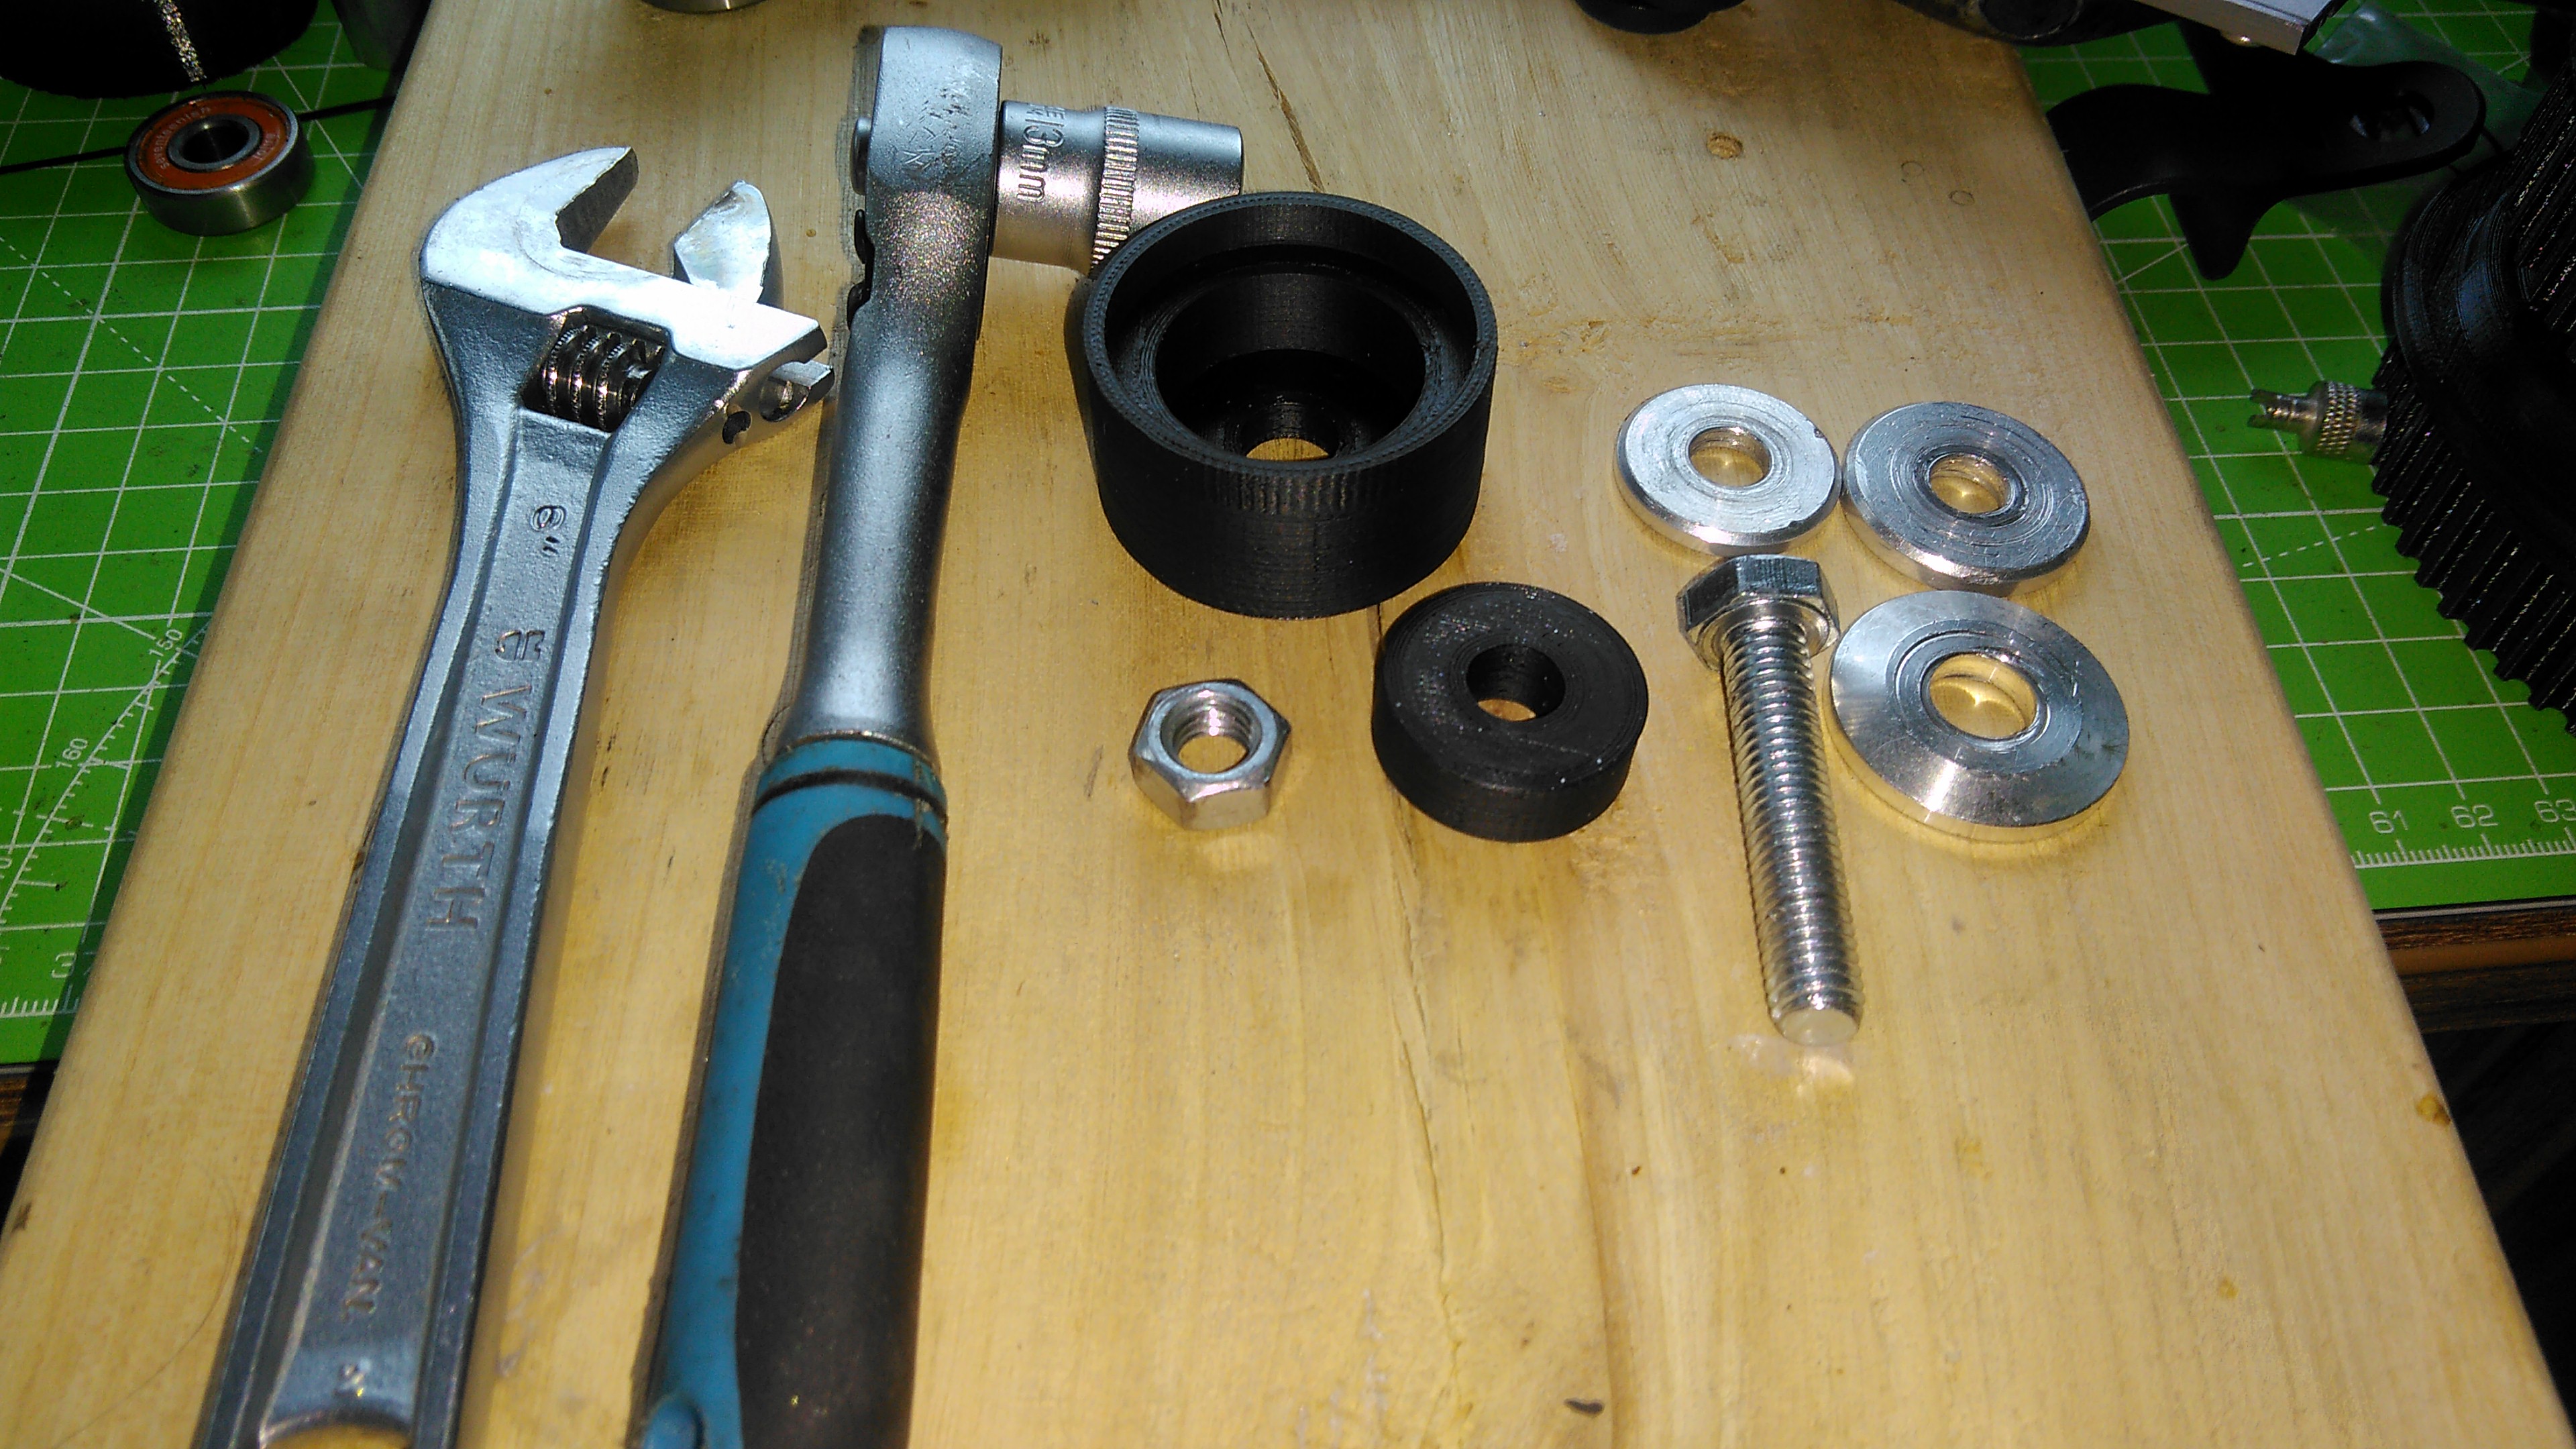
- Ratcheting socket wrench, M8 bolt head size (13mm socket)
- Adjustable wrench or another ratcheting socket or even a simple wrench for holding the other side (M8/13mm)
- M8 x 40mm++ bolt, 8.8 strength is enough
- M8 Nut, 8.8 strength is enough
- 23mm M8 washer (Got this from SK3 accessories) - This one is used for pressing the bearing back in.
- 25mm M8 washer (Got this from SK3 accessories) - This one is used for pressing the bearing back in, centering and support
- 28mm M8 washer (Got this from SK3 accessories) - This one is used for pulling, you can use any other of the two mentioned above, as this is unconfirmed necessary
- 3D printed puller (the big cylinder jig)
- 3D printed press (25mm “bearing”)
The 3D prints are mandatory to be printed out of PLA!!! PLA has the biggest strength for these kind of loads.
Settings(reference):
First layer: 70’C bed, 215’C hotend 2nd layer and above: 65’C bed, 210’C hotend Cooling fan: 50% with auto cooling if supported Perimeters: 4 Infill: 100% rectilinear, don’t skimp, compression forces when pulling are no joke
Files: https://drive.google.com/drive/folders/1IuC-yWQQ25BUsvyrB41DOl68Rjvh4lne?usp=sharing (Small washer model is thicker.)
The pulling:
- Put the tool above the bearing
- Push the bolt through from the bottom of the bearing

- Place a washer corresponding to the model you downloaded
- Put the nut on

- Hold the bolt from the top and start ratcheting from below
- You might hear a loud pop when doing it, it’s not the plastic, I was spooked too, it’s the bearing unseizing(steel inside aluminum)
- Unscrew when done and go back to step one

The pressing:
- Put 23mm washer on the bolt
- Put the bearing on the bolt

- Put the assembly at the bearing seat, make sure to pre-center it a little, but 23mm washer should take care of it while tightening
- Put the pressing printed part on the bolt, fit it inside the slot

- Put 25mm washer on the pressing printed part
- Put on the nut and tighten the same way like with pulling

- Once you cannot really tighten anymore (don’t over do it, you will see the bearing seated anyways), loosen the bolt and go back to step 1

The tool also “compacts” itself quite nicely and can be kept in your pocket if you so desire:


Hopefully this helps somebody. 
Fun extra: Pull and push bearings several times so that the seat becomes a little bit “acquainted” with the bearing. Makes further maintenance a breeze with pretty much no force(still impossible to push in by hand, but much easier on the torque needed). Make sure to clean the seat after every pressing/pulling to get rid off the small shavings of aluminum.
14 Likes