For my first build (which I started about 2 years back on endless-sphere and still haven’t documented here), I designed my own everything. Deck, motor mounts, battery pack and charging mechanism, enclosure, etc.
The motor mounts were particularly interesting. In those days, Enertion, Alien Drive Systems and DIYelectricskateboards were selling these crazy expensive machined motor mounts. I couldn’t afford that at the time, as well as batteries and motors, so I decided to try something different. This was before @psychotiller’s mounts, which I believe are the best bang for buck out there at the moment, barring my own.
Here cometh the laser cut alu plate. I worked out a way of stacking laser cut alu plates of different thicknesses to create my driven pulley and wheel mount, as well as the motor mounting brackets. A little bit of thinking and some cad work got me a pair of light, high performance (possibly higher than what was out there then) wheel pulleys and motor mounts. I remember my order from the laser cutters back then was less than $100 for 2 drive sets, 2 motor mounts and a lasercut and bent alu battery and electronics enclosure.
For all of those out there trying to do this on a budget, with more time than money: get yourselves a CAD package - the open source ones will do, and design your own parts. Send the DXFs off to the laser cutter and there you go. Laser cut (and bent) plate is the cheapest easiest way to manufacture custom parts anywhere in the world at the moment.
Anyone else done their own design and manufacturing of the critical mechanical eboard parts (wheel pulleys and motor mounts) to save costs here?
I’ll post some pictures and screenshots of my previous design, as well as the one I’m currently working on for r2 when I get a chance.
Since about 2006 when I first found SketchUp. I’m an electro-mechanical engineer and we were taught how to use Solidworks in first year in 2009, and it’s the business. There are ways of getting hold of it.
I’ve dabbled in other things too over the years. AutoDesk products, Proeng, Creo, parametric script driven rendering and a lot of the open source package.
SketchUp is a good place to start for 3D. And DraftSight is great for 2D drawings. If you have a bit of conceptual depth perception, all you need is 2D for laser cut eboard parts.
A bit of basic post machining for drilling and tapping holes and you’re sorted, for a fraction of the price.
Definitely a bit more time and effort involved than buying off the shelf solutions from the various diy eBoard part manufacturers and resellers. Definitely more rewarding. The only thing I’ve ever bought from eboard shops is 2x VESCs, last week, for my latest build.
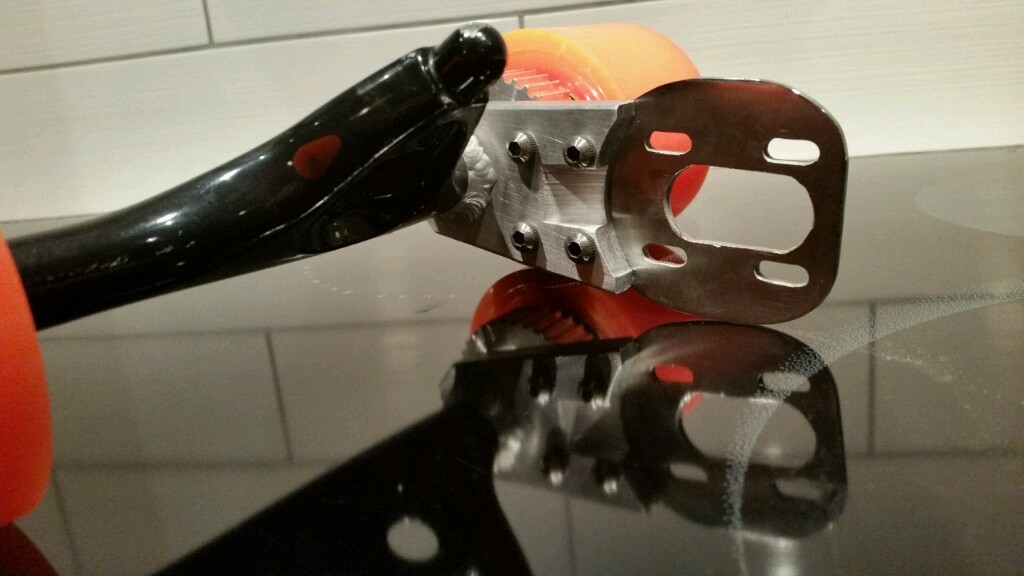
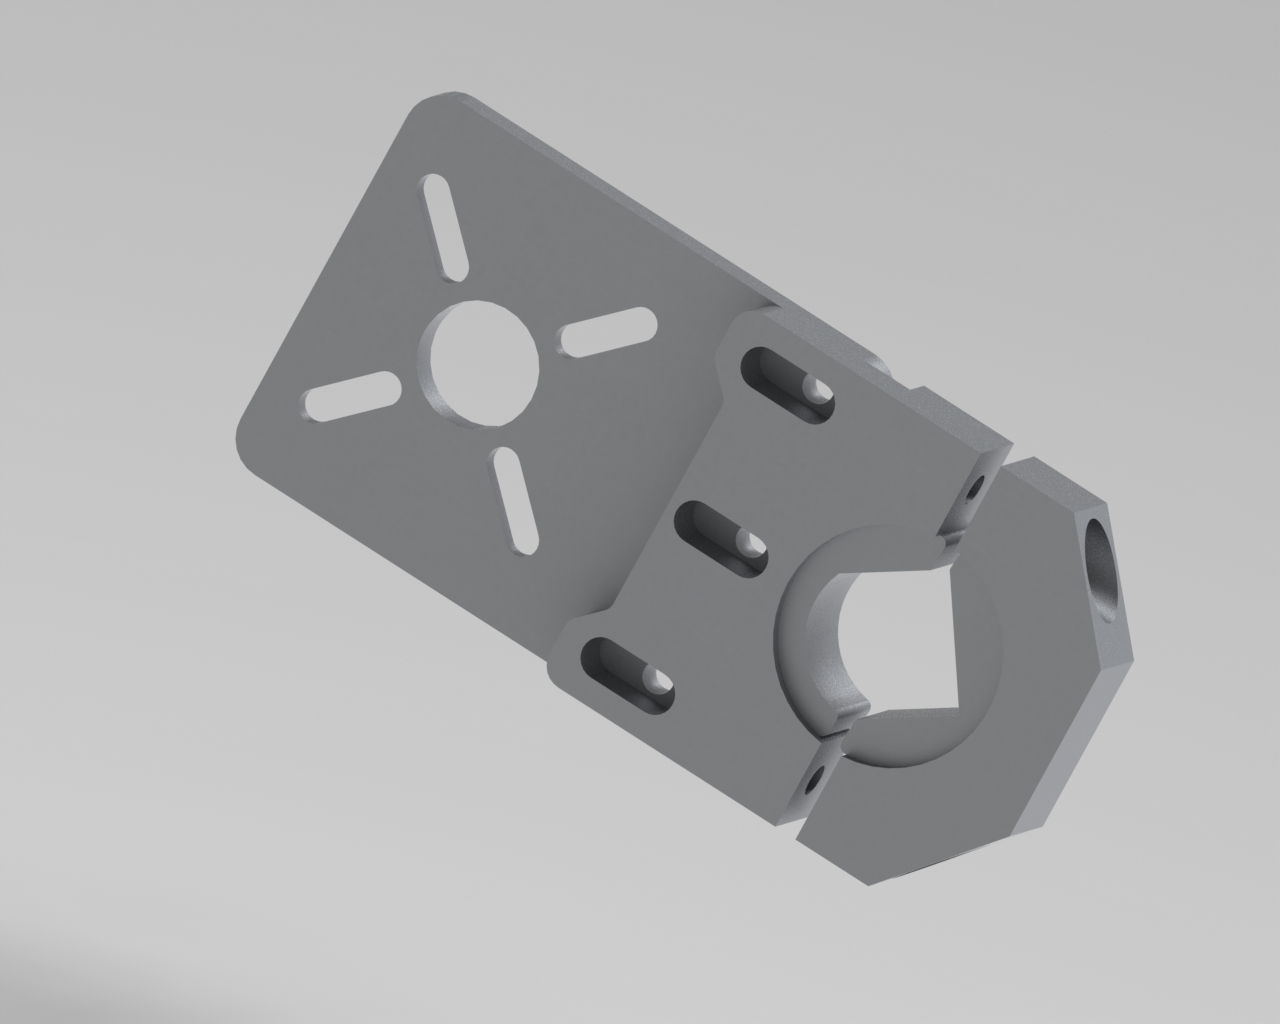
The hanger bracket has a threaded hole and a through hole on the end to clamp it to the hanger. The motor plate then just bolts on, and the motor is bolted on to this.
The drive kit has a spacer between the pulley and flange on the one side, and a clamping ring on the other to clamp it to the wheel using M5 bolts.
I looked at the quote again just now, and 2 sets of those parts above I paid around R 750. That’s about $ 49 in today’s terms.
This is the mount and drive wheel kit I’m designing at the moment for dual drive Maytech 6355 230 Kv and a 12:36 pulley ratio with 83 mm Flywheel clones.
I’m going with a stainless steel motor mount plate and alu hanger brackets, with all stainless steel mounting hardware. I’ll keep the pulley parts as alu, because I like the way they don’t rip belts apart. I think the burrs on SS would kill belts.
I really want do a build with Otang Kegels soon. They look really cheap and easy to design around. Possibly a 6s mono Penny Board. That would be something cool.
I also designed my own mount hardware, as after purchasing the motor and VESC I felt rather poor. Also, it’s ridiculously expensive to import stuff to RSA, so decided to try save some bob and do it myself. A friend of mine has access to a laser cutting machine and was willing to help me out in his free time, so I showed him the schematics and he drew them up in SolidWorks and got the parts to me like 2 days later. I owe him hugely!
My trucks aren’t like any of the ones I’ve seen on here, so I’ve taken a combination of various mounts and hashed them together to make mine work with a welded/flexible mount. I’ll post pics when I get a chance.
@Randyc1 I have to to give you my respect for that craftsmanship. Great milling solution and I have never seen it this way before.
I have a mill at work (HERMLE C30 U) which i can use, but this forum impresses me with solutions if you don’t have professional equipment. Thumbs up!
I had a set of DIY’s V4 mount, but it keeps slipping to the wheel side. Just couldn’t get it fixed. So I decided to design my own mount. The design is inspired by DIY’s universal mount(discontinued), alien’s and Enertion’s mount. Here is how it looks.
My DIY v4 mount kept slipping too. If you haven’t fully gave up on the mount then you can try this.
I redid the whole mount and put in new screws with loctite. Even that large one. Then I tightened it as much as I could (almost felt like I’d break my wrist haha) and let it sit for 1 day. I think letting it sit with loctite really helped.


 I’m going with a stainless steel motor mount plate and alu hanger brackets, with all stainless steel mounting hardware. I’ll keep the pulley parts as alu, because I like the way they don’t rip belts apart. I think the burrs on SS would kill belts.
 I really want do a build with Otang Kegels soon. They look really cheap and easy to design around. Possibly a 6s mono Penny Board. That would be something cool.