You need some sort vacuum to make a nice enclosure. You could use one of those storage vacuum bags.
You mean the ones that come with vacuum attachment?
HI! ABS would be fine, I just found PETG easier to print on large model. It also more flexible which is importatant too. I went for PETG, 3 mm walls but I would say 4mm is better. I attached all the hardwares to the board otherwise the printed enclosure will go through hard time. My enclosure held up pretty well for one month and a half then it started to crack down in the points were I had some problems with the nozzle during printing and were the hardware was pushing from the inside (i made the model a bit undersize). So basically it would be fine, I just made some mistakes along the process. Then last weekend I finished my first fiberglass enclosure and I used my printed one as mold. Way more stronger than the printed one, but heavier so it is not a bad idea choose to reinforce the 3d printed enclosure with fiberglass. You have mainly 2 options: keep the 3d one outside or inside. If you choose to laminate the fiberglass inside, than keep in mind that you are going to loose room for your parts, so printed overall 4-5mm bigger. If you choose to wrap it with fiberglass outside than the regular size should be fine. For mine I used a vacuum bag (the one for storing clothes), as @ninja suggested with the Ghetto Vacuum. The vacuum bag will help for a better final look, although if you add fiberglass inside you can probably go without since even if the surface is not perfect you are not gonna see it. I would reccmmend to use it anyway, it’s easy and helps a lot. For the type of fiber glass you can go for the matt one, cheaper and easier to laminate and remove air bubbles (important step if you want a strong structure). The lighter matt the easier to laminate but on the other side the more layers you will need. I used 260g/m2 matt fiber glass and I used almost 500g/m2, probably way too much, it’s a rock! a heavy rock  Something like 7-8 layers. I would suggest to go for 350-400g/m2 so you will need to laminate 4 layers to be fine or even less if you just want reinforce your 3d printed enclosure.
You could also use the 3d one as mold and since you are doing the process anyway, you will get a stronger enclosure with your personalized shape that you like the most. I hope it helps!
Something like 7-8 layers. I would suggest to go for 350-400g/m2 so you will need to laminate 4 layers to be fine or even less if you just want reinforce your 3d printed enclosure.
You could also use the 3d one as mold and since you are doing the process anyway, you will get a stronger enclosure with your personalized shape that you like the most. I hope it helps!
4 Likes
Thank you so much!! This is a huge help! Guess I’ll start looking for vacuum bags. I just found his post, linking it here for anyone else who’s interested.
1 Like
I used these one I belive. I actually just have them at home  https://www.amazon.de/DIBAG-Bags-Pack-Set-23-6X15-7/dp/B00YT2ND72/ref=sr_1_1_sspa?ie=UTF8&qid=1527769585&sr=8-1-spons&keywords=vacuum+storage+bags&psc=1&smid=A2WOQ2RSPVITY6
If you want the fiberglas outside, for a great smooth final look I would suggest oto buy also an epoxy gel coat. basically after yuou finish you can apply it and it will cover all the small imperfection and holes in order to have a smooth urface, than you sand it down gradually, for instance from 200, than 400, 800, 1200 wet sanding and you will ger a perfect finish. You can see my Spud build. Unfortunatelly I didn’t have it the gel coat so the surface is not perfect, it’s smooth because I lost the use of my arm for sanding it, but to cover the holes the filler I used during the painting was not enought.
Just checked out your build, I’m doing something similar! I have a jet Spud deck (the gray one), the problem is my battery is 10s5p…
The second board is 36" so I might try that one instead, but I think I’ll still need to put the vescs on top. And before anyone asks, the reason for the battery is a tight budget, so I’m repurposing my previous (first) build.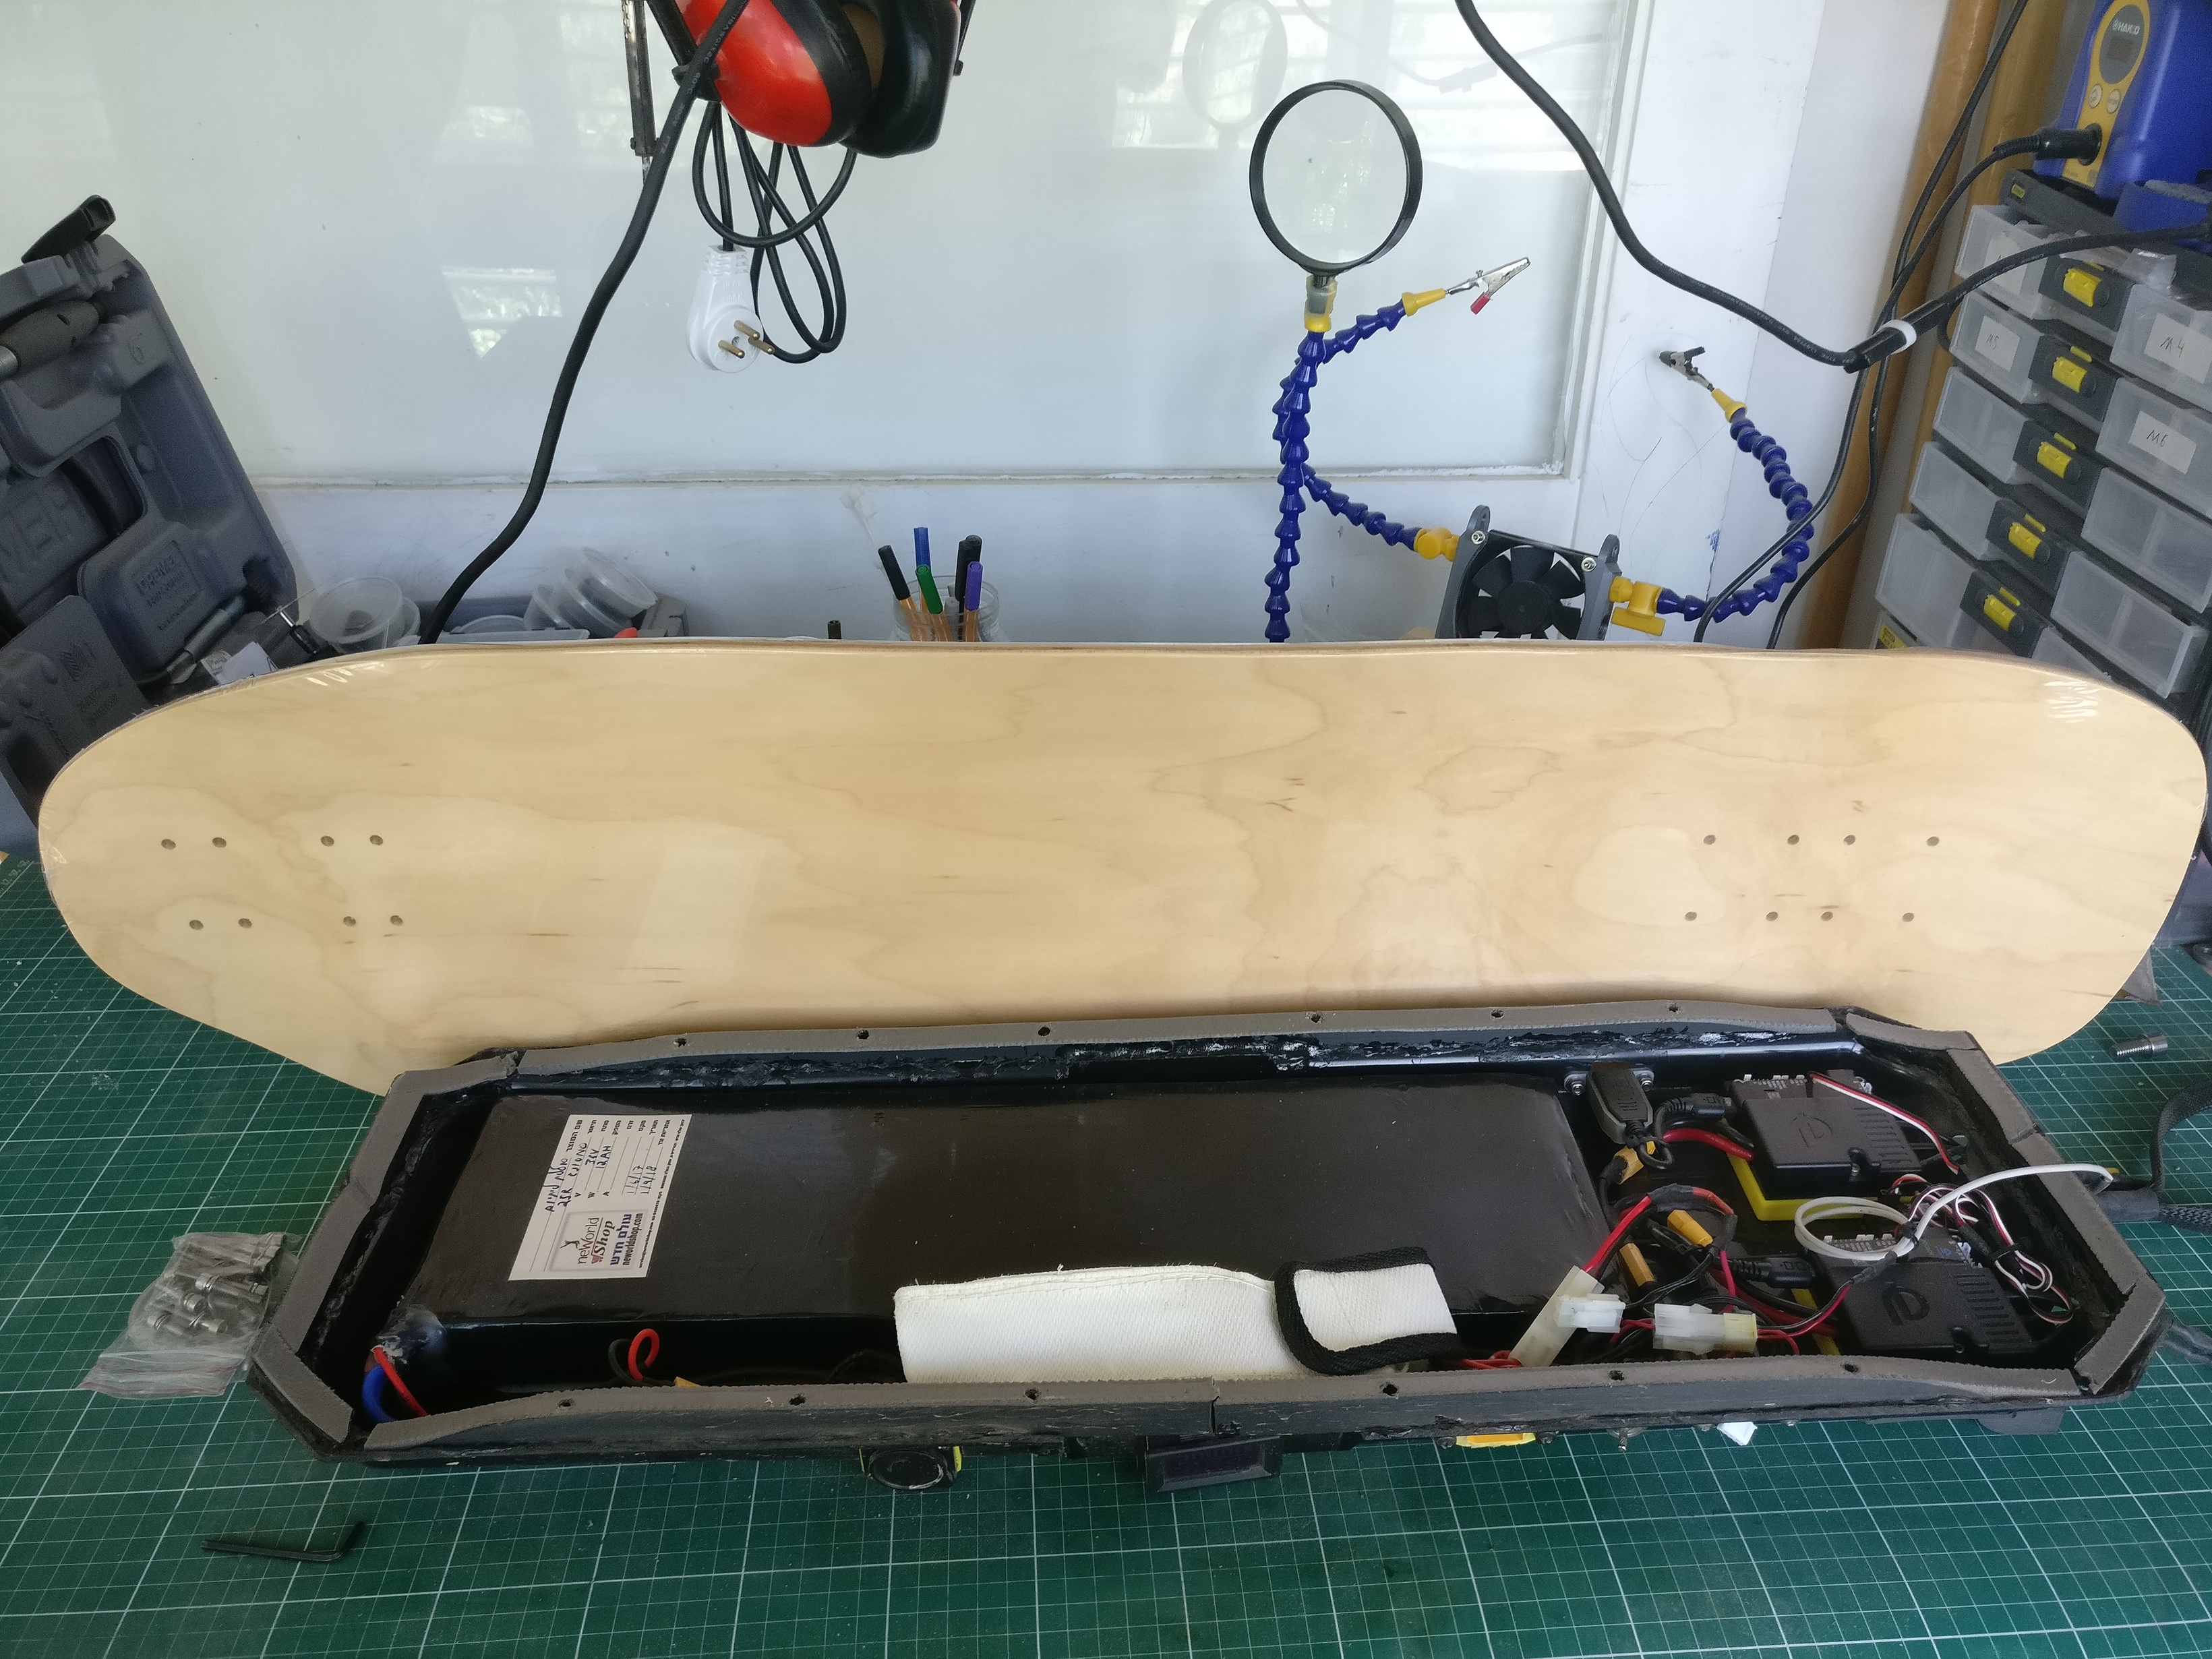

1 Like
I’ve started printing a case for my Trampa HS11 build. Unfortunately eboosteds enclosure would be too small for the BMS and ESC combination I want to use. So my plan is to print them, tidy them up and mold the enclosure to then produce masters in fibreglass.


4 Likes
If you print correctly you can skip the composite on top, mine have been fine for 300km of bad roads and lots of vibrations
The main tip is print hot, more than you usually set to, this makes the layers have a better adhesion, the surface may look bad, but you can sand afterwards
2 Likes
Moreover you can also use a filler primer to give you a better smooth surface.
1 Like
How is the battery configuration? Double stack I guess. I used a 10s3p with a huge BMS. That why I had to make my own enclosure. I see other spud builds with 10s4p as double stack. I see this morning a guy on reddit that used the diyeboard dual belt 10s5p kit and it’s tick but doable. For sure with a longer deck you can use a thinner enclosure because the space is limited under the spud. If your board would be a commute one, than Spud for life.
Yeah, it’s double stacked but still works out to 46 cm in length. I can just fit it under the Spud, but nothing else. Totally agree with using the Spud deck if I can, I’m doing one like unik’s with the trampa trucks and tires. I know psychotiller makes a one or two enclosures that would work for me, but since I have a printer anyway I thought maybe I’d try this myself.
How hot exactly? I forget what temperature my hotend is but the bed is already at about 110C.
Ah ok cool now I got it. then if you are going to use such big tires, double stack won’t be a problem. For the enclosure if you are going to use it offroad you better use fiberglass outside to protect the board from rocks. IN this case I would suggest you design the enclosure as you like it, then print it with out edges so you can use it as mold for the fiberglass one. It will fit perfectly the board concavity. I mean you are going to do laminate anyway. I do not know how much is gonna cost for you fiberglass + resin (epoxy or polyester) + roller + brushes + gelcoat ecc… because othersiwe can be a cheaper solution go for a pre-cast enclosure. Of course id you want to do it diy, I agree that it’s really a nice experience.
I think I printed using 235 or 240, usually I use 225 for better surface finish, but this vary from filament to filament
The best you can do is get an enclosure for the printer, large ABS parts will deform in a open printer, I spent a lot of time with a hair drier deforming back after printing and needed a lot of sanding to get it usable


3 Likes
That was the first thing I upgraded for my printer. All set on that front ![]() Since I’m planning for my components to sit in the enclosure I should probably make it thicker, maybe 4 or 5 mm. Of course, then weight starts to add up, even before the fiberglass.
@rey8801 that’s the big question , I’ll have to check total cost. I also don’t want to have to spend too much time on this, I want to get back out there…
Since I’m planning for my components to sit in the enclosure I should probably make it thicker, maybe 4 or 5 mm. Of course, then weight starts to add up, even before the fiberglass.
@rey8801 that’s the big question , I’ll have to check total cost. I also don’t want to have to spend too much time on this, I want to get back out there…![]()
IF you want to sit your component in the enclosure than the 3d printed one is gonna be a challenge. I would advice at least the battery to be fixed to the deck. I used strong velcro and it does the job. Regarding the time…You will spend a lot of time, that’s for sure. Then I will say even if you have to add 10-20$ for a pre-made enclosure, go for it because it’s worth the time saving. With the 3d printed you can still do a lot. I designed and printed my raiser to perfectly fit the spud deck and to host a shock pad. You can print mod enclosure for the remote, xt90/60 port, vesc enclosure ecc…
If you plan to put fiberglass in it you can keep it thin, mine is 2.4mm and already weight 300g You have to plan carefully the mounting point, make space for a washer between the screw and the plastic. I made the mounting role as small as possible to fit just the head of the screw so I can’t really put too much torque os the screw
Okay, new plan, courtesy of my overactive brain at 1:00 am. I found some aluminum frames meant for plasterboard (otherwise known as drywall I think), which I can cut into strips and bend to make a sort of ribcage which will be bolted to the deck. The battery will rest inside this like so:
I haven’t made the bends yet, just started cutting. I can print enclosure sections which will attach to the metal frame and thus they won’t take the full weight of the battery.
Will the wheels not foul on your battery? Or is this not the deck you are thinking of using?