If you all want more video evidence tell me exactly the type of thing you want to see this remote do… then I’ll go and film it…
sent you some videos just now via email (don’t want everyone to see where i life  )
maybe you can tell from them if it’s working as intended or not.
)
maybe you can tell from them if it’s working as intended or not.
Jason, I think you made a solid choice with the remote. The signal issues - at least for me - seem to all be related to the lid. Outside of that, YES, I am definitely NOT used to the torque output. This is my first electric skateboard. Perhaps that’s the crux of the issue, but for me I’d like something that delivered the initial power more softly but ramps up to full power. This is not because I don’t like the power or don’t want to accelerate. Rather, it’s because I don’t ALWAYS want to go fast. I’d love to get the cruise control to work at something close to a steady 8mph so I just cruise & carve, but I simply can’t do that.
Going back to my first statement, this isn’t a criticism about the remote. I think it’s something that can be handled in software, either by changing the drive mode, or by modifying the sensitivity of the remote to something less linear. I plan to play around with those settings and see if I can get it more to where I like it.
1 Like
Try “soft rpm”, it helped me a lot. It eases into the 3 speeds that we have (15mph, 20 mph, 28mph). So much better. Only problem is since the throttle curve is so bad, you’ll never be able to ride at 8mph consistently. I’m sure there is a way to fix that curve, but nobody knows how.
It’s definitely a combination of #2, 3 and 4. The trim was perfect for me. I think a lot of people are thinking of this as a casual board like the other Eboards on the market and it’s not that… Which is why I purchased it. You can slowly accelerate in mm it just takes sensitivity. I even walked my 2 lb dog on leash with it and didn’t ever accelerate to hard to hurt him. It just takes time and practice.
1 Like
My instructions to reduce the aggressive low-speed power of the raptor.
NOTE: please test with lid off first! This is to make sure your problem is not related to poor signal, if nothing changes with the lid off & the signal seems responsive its fair to assume you can get some results with the below instructions.
1. Reduce motor current.
- See “Motor Max” change this to 40
- To reduce the brake force, change “Motor min (regen)” - this is also rider weight dependent. Maybe try -10 or -20 to get it perfect you will need to use trial & error.

2. Re-tune or customize the PPM settings.
- Adjust the “Soft RPM Limit” settings
- Increase the Deadband
Watch this video too:

3. Limit Top Speed using RPM limits You might also try setting the ERPM Limit Start at 20000 This will start limiting the Speed at around 10km… Could be a good idea until you get your bearings. Otherwise maybe try these settings below… Its really up to you. You can tune this to meet your expectations.

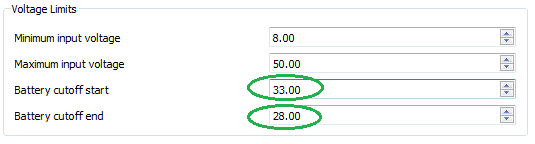
My instructions to reduce the chance of unexpected shut down due to low voltage & voltage sag.
1. Utilise the VESC’s built in LVC settings
2 Likes
That video is great. I literally just got done changing my settings and was going to post my findings when I saw it. Although I was able to figure it out, that video explains it very well. I simply cannot express how much better the remote is for me after making those changes. I recommend everyone isn’t 100% satisfied with the remote WATCH THAT VIDEO AND MAKE THOSE CHANGES. What a difference it made for me. Seriously!
I only changed the deadband & min/max pulsewidth and now I can cruise at slower speeds at a steady pace. I’m SOOO happy!!
One thing I will say is that my min & max are far different from those in the video, but it looks like he has a different remote altogether (I could be wrong). Anyway, my remote min was 1.14 (I used 1.15 as the min pulsewidth), my max was 2.08 (I used 2.15 as the max pulsewidth), and I set the deadband to .17. The default settings were deadband .15, min, 1, max 2. So changing the numbers even slightly has a pronounced effect.
Thanks again to Jason and Enertion for making such a great board. Not only does it outperform the competition, but you can also customize it to your liking. Perfect!!
EDIT: A few things I thought of that might help others edit their settings:
-
The firmware version on my VESC is 1.14, so the download link provided by Jason previously did not work. Another VERY helpful dude pointed me here which worked: http://vesc.net.au/BLDC-TOOL/Windows/OLD%20Versions/
-
Make sure you install the STM drivers FIRST. And NOTE: There are 2 installs (read the readme!!). Once this is done, connect the battery to the board and turn it on, then connect the VESC to the computer using a mini-USB cable. You should hear the normal sound when connecting a USB device, and Device Manager should show the Virtual Com Port. If not, you have a problem with either the driver or the connectivity (my prob was a bad cable). After that it’s just a matter of running the BLDC_TOOL.exe.
-
I had trouble reading the configuration until I went to the Realtime Data tab and checked the “Activate sampling” box. That seems to get the communication working and I was able to read the config (NOTE: You seem to need to read the config on each page!).
Again, I hope this helps.
4 Likes
I wanted to keep this separate from my previous post. For those that were potentially interested in the other control modes, Here is what I found:
Duty Cycle Better than the “Current no reverse with brake” default settings, but after making the changes to the default settings I liked “Current no reverse with brake” better.
PID Speed Control VERY good if you really just want to go slow. Allows for very precise speed control at slower speeds, but top speed was down significantly. Here again, I didn’t try very hard to fix this by playing with the settings (or trying PID Speed Control No Reverse), so perhaps that’s possible. One thing about this mode I did not like at all about this mode is that when the control stick is neutral it means speed=0. In other words, the board applies the brakes to achieve 0mph, so no coasting.
Hopefully this helps others. I’m happy to answer any questions.
2 Likes
@Xusia man oh man this is reassuring news… I’ve been feeling sick for the last few days thinking over everything thats been happening…
The ability to customize your ride is why the VESC is so awesome…THANK YOU BENJAMIN VEDDER! Also, None of us are the same, we all have different expectations & reactions to inputs from the world around us.
I remember my first eboard build, I had to detune everything in the Alien/Flier ESC otherwise i would shit my pants… I suppose that’s what’s partly what’s happening to many of you guys too… the standard settings are just way to aggressive…But i do feel confident that in a week or so you will feel very natural on the Beast Raptor!
ALSO, I never rode your boards on the street, So I could only program the VESC with settings I have on my board. So I suppose what we are learning is that the remotes have all got their own “personality” in terms of the “trimming” so they really all need to be programmed separately.
So now the question is, how do I build a rig that allows me to ride every customers raptor, to finely tune the PPM, without getting it super dirty?
Maybe I need to invest in a treadmill. This way I can check the Pulsewidth settings, ride the board to make sure it’s working properly, and not get it dirty

PID does go fast, you just have to change “PID max ERPM” to 100,000.00. PID is awesome, unfortunately we cant coast on PID…
Here’s a video I made to hopefully help others: https://youtu.be/g96Vegbz-SM
The first part is about the cable. If you are like me, you probably have a ton of those cables lying around. Rather than buy the right-angle adapter, I just dissected one of those. It’s really easy and only takes a couple minutes.
The second part shows where to make the changes and the results of the new settings. It’s only on the bench, but you still see remarkable results. I also tested it in my garage, and while that’s not really what I’d consider a good test, it was enough to validate the results. It really is SOO much better! I can’t wait to try it out when the rain stops and ground dries (so, in like 2 months… KIDDING! But it is Oregon…).
Again, I’m happy to answer any questions if people have them.
2 Likes
great video man, I’m glad you have found a good setting.
I think we all know that this is a learning curve for some of us, and you could only really set it up as you ride. Dont think there is a way for you to test each new board. Plus the fact I dont think theres that many hrs in your day to do that, even with help.
The one thing I gathered with the boosted is it has the 4 settings on the remote which give the rider instant control. I could not just let a stranger use my Raptor in fear of injury.
I understand your baby has a few niggles, but it looks like there is hope. Ive got another board now to do all my beginner testing with the full Raptor 1.0 ready for blasting when were all comfortable with the speed.
We all want it to be a success, and I think thats why we are sharing on here our niggles. I dont think anyone with one of these boards is wanting to aim their frustration on you or the company. It does show with what Xusia is saying that maybe the contoller is not set up the way you think for other users which was what Nasty was also trying to say. IMO
Based on what I saw and what others have described, my theory is that each remote is just a bit different. The numbers that worked for me, might not work perfectly for someone else. But I didn’t have to ride the board to find those settings. I found them fairly easy on the “bench,” and I think Jason could easily do the same. I don’t think it would take that much time, and I think it would be time well spent.
While generic settings “work” they don’t present the product in it’s best light. Also of concern (I would think) is that this is a higher level of performance than virtually all other boards, and therefore the difference between “works” and “works well” can be significant.
1 Like
fantastic work on the video @Xusia!!
especially mentioning that you need a data USB cable as opposed to just a power one; I feel like a lot of people miss that when trying to set up their VESC’s.
Wanted to give some extra protection to the battery LCD, so have cut up some clear dvd blank which a is about 1.5-2mm and taped it to back of lid. Much better.


3 Likes
so i’m off to the mall now to get one of those USB angles and see if something shows in the setup that’s out of the ordinary. i lost overview of the posts so could someone tell me if I only have to plug in the USB to one VESC or repeat the process for both? thanks!
i don’t want to start this topic again but my problem seems of a different nature. it’s impossible to keep my board at a steady speed other then full speed. after 1mm of stick movement it wants to accelerate to 100% speed. keeping the thumb steady in such a tiny margin on a moving platform is not doable. the riding tips video of onloop cruising at the beach at lower speeds, or in the promo where the guys cruising at the mall? simply not possible with my board due to this.
but i’m confident i can adjust this behavior with the guides posted so far. will post the results!
1 Like
@xusia 's video and comments make it clear we should have a lot of flexibility for getting the control behavior modified to our likeing.
You’ll only need program the master VESC on your Raptor dual.
I’ve linked all the “numbers” posts from this thread and Raptor Specific VESC information here :
It’s my hope that people will share their Raptor specific VESC programing information there. I hope to keep it about the numbers, and results, so that is the go to sorce for this type of information and troubleshooting.
1 Like
May I also suggest car door edge trim from Autozone for the LCD? I use them for my Space Cell enclosures and its surprisingly helpful in protecting it from the elements. I’ve ridden through very harsh Michigan weather recently and it holds up.

Please reconstruct this video in you living room. That’s impossible with the raptor and the remote settings! The torque isn’t the problem. It’s the unpredictable communication between controller and VESC.
1 Like